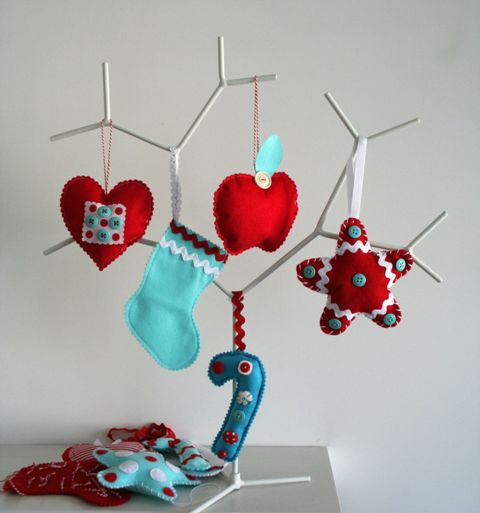
Why buy Christmas ornaments that look handmade when you can actually make them so easily? Sharon from The Key Bunch requested me for instructions on making Christmas ornaments so I’ve tried to document all the steps you need to take when making your personalised ornaments. So, this is not really a tutorial, but rather a bunch of suggestions written in an orderly manner. Shall we get to it?

1- First of all, you may want to look at some books, magazines, blogs and flickr photos for inspiration. Decide on shapes and look for patterns online. That’s right, I’m not going to provide you with any template, sorry! Just google ‘candy cane’, ‘Christmas stocking’, ‘gingerbread man’, ‘mitten’, ‘heart’ or — even better — draw your own shapes. Then assemble all your materials: various pairs of scissors, a pencil/pen, your glasses (optional), as many types and colours of thread as you wish, baker’s twine (if you own it), loads of buttons, fabric scraps, rick-rack, ribbon, pins and needles. You may notice that I’ve chosen a very limited colour palette because I believe that’s the key to success. But of course you can go wild and pick all the colours of the rainbow.
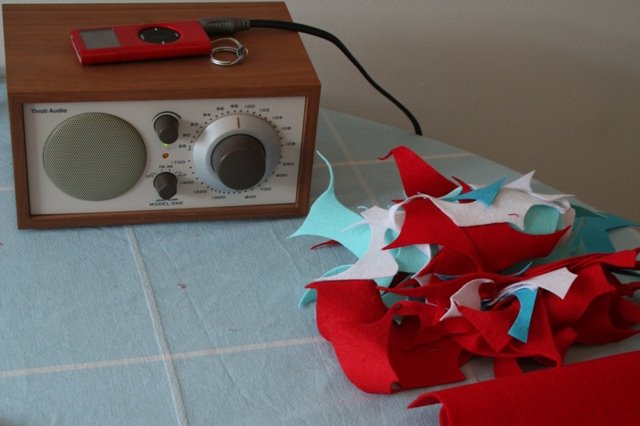
2- Gather all your felt scraps and turn your radio on!
–
–
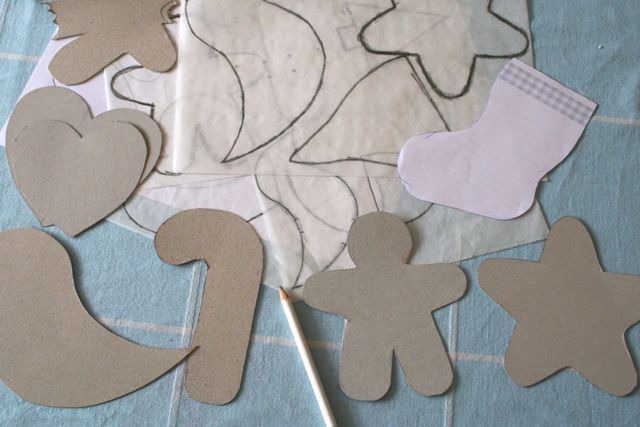
3- I decided I’d make my templates the old-fashioned way: first I printed them out and then traced over them using some tracing paper I found at the bottom of a drawer (I think I have these sheets since primary school). I then traced the shapes onto a cereal box for durability.

4- Trace all your shapes onto felt and cut them neatly. Always trace and cut in pairs because you’ll be stuffing the ornaments later.

5- Here they are all cut and ready to be embelished.
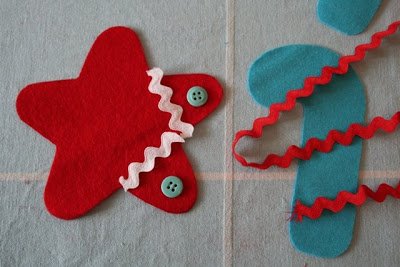
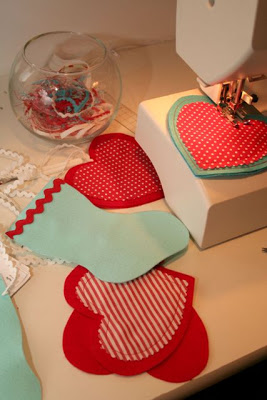

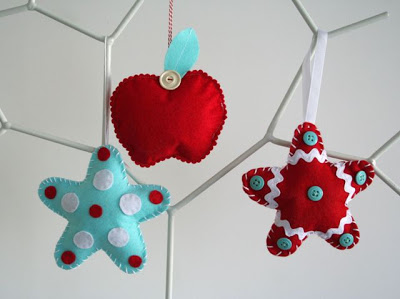
6- Now comes the fun part: play around with rick-rack, ribbon, buttons and scraps until you are happy with how it looks. Then sew everything onto your ornament piece. There are so many possibilities here that I had to choose and show you how to make only one type of ornament. That means that from now on you’ll watch how to finish this star; then at the end of this set you’ll see other examples of ornaments you can make.
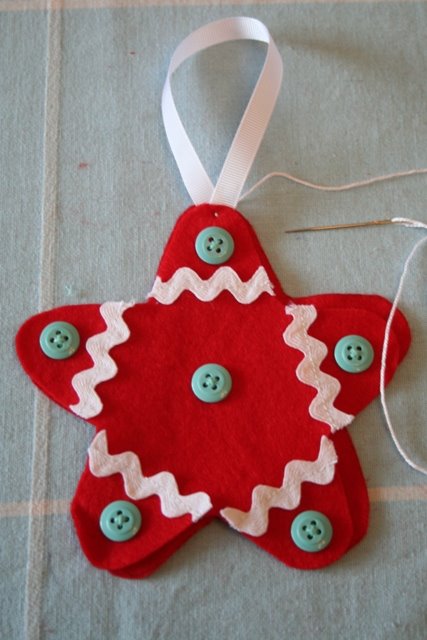
7- Let us get back to the star: make a loop (you’ll want to hang it on a tree branch, right?) and begin sewing the front and the back pannels together.
–
–

8- You can do it either by hand or machine and use different kinds of stiches. Here I sewed it by hand using the simplest stitch ever.

9- When you’re nearly finished, grab a bit of polyfill and stuff it through that little opening. You may want to use a chopstick or other pointy tool to get the stuffing in all the tiny and tricky places.
–

10- Close the opening. You’re done! 🙂
–
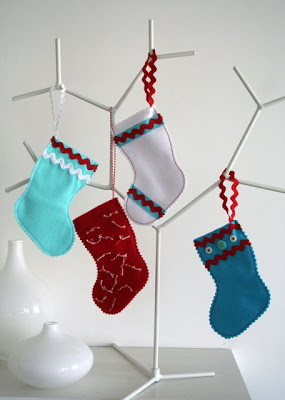
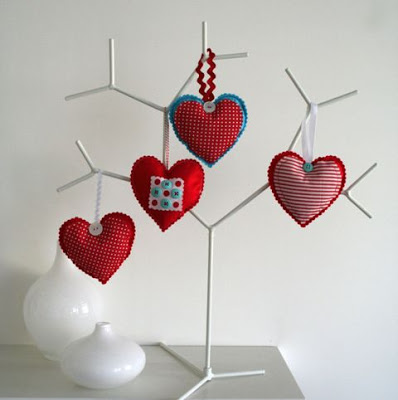
As I said, I’ll show you other examples of things you can make using this technique. Have fun and if you make something based on these instructions I’d love to see it!


Concha these are great.thank you for your sense of aesthetic.s
LikeLike
These looks really beautiful and nothing beats such gorgeous creations done by hand.You gave me some great inspiration to work with – thanks!
LikeLike
olhe aqui vocêhttp://ninainvorm.punt.nl/
LikeLike
São todos, mas mesmo todos absolutamente deliciosos! Parabéns!
LikeLike
Mais uma mão cheia de criatividade,parabéns.Ana(Já agora,porque poderá haver mais algumas cotas ,como eu,a visitar este blog e cujo inglês já ficou para trás há alguns anos, não deixe de postar na nossa língua mãe.)
LikeLike
Uau, são todos tão giros! Gosto muito da ideia e da explicação, acho que vou tentar fazer alguns para a minha árvore de Natal 😉 Entretanto, dá uma espreitadela ao meu blog, estou a comemorar o meu 100º post com uma oferta especial 🙂
LikeLike
So sweet!Thanks for the ideas. :o)
LikeLike
I love these – I’m going to get some felt this weekend and make them all!!
LikeLike
Gosto tanto de todos 🙂
LikeLike
Conchinha, só para contar que agora sou adepta do teu blog e que venho espreitar a tua criatividade todos os dias. Nunca imaginei esse talento escondido e o que o futuro te prometia;) Aproveito para contar que me mudei, que estou a viver sozinha e que tenho uma prima a viver no mesmo prédio debaixo de mim. Já a desafiei a tirar a máquina de costura dela (nunca usada) do fundo do armário e começarmos a tentar fazer algumas coisas simples as duas. Vamos ver se nos sai alguma coisa de jeito… Vou começar pelos sacos de praia, encontrei aquele tecido dos tomates do Andy Warhol no Vidal, estou com vontade de fazer um assim 🙂 Já agora, onde posso fazer encomendas? Queria encomendar umas coisas que vi para a minha mais recente sobrinha (tens de conhecer a Mariana, é linda)! Um beijinho muito grande para ti e para o Tiago. Maria HM
LikeLike
Maria, respondi-te por mail (tenho o teu mail netcabo, é esse que usas?).Muitos beijinhos!
LikeLike
Que lindos e delicados,foi muito feliz na escolha das cores e na combinação dos tecidos. Ficaram lindos!beijinhosCidinha
LikeLike
A minha mana documentou as decorações de natal que fiz < HREF="http://milly6.blogspot.com/2006/12/some-of-our-new-christmas-ornaments.html" REL="nofollow">há dois anos em feltro<>.Todos os anos, vou adicionando mais alguns, tanto em feltro como noutros meios. Não são feitos em cores tão alegres como os teus…
LikeLike
Thanks Concha! I know how busy the season mst be for you, and yet you put this together so quickly, and so brilliantly. Thanks on behalf of the KeyBunch:)Sharon
LikeLike
Muito bom o tutorial! Parabems !
LikeLike
your ornaments are precious ! and so is your blog …
LikeLike
I just came over here from Sew Mama Sew. You’ve done a beautiful job making these. I love the colours you’ve chosen and the embellishments. They are all so beautiful. You are absolutely right, it isn’t hard to make our own tree ornaments!
LikeLike
Wonderful! Thank you so much, for sharing this with us ((O:
LikeLike
these are beautiful! unfortunately my house is all decorated this year, but this is in on the list for next year. thanks so much for sharing this with us!
LikeLike
I also came over here from Sew Mama Sew. Thank you for the lovely tutorial.
LikeLike
I borrowed the idea for a gift for my son’s kindergarten teacher. I had him trace a gingerbread man cookie cutter onto felt, cut it out, and sew the two pieces together, and we stuffed it. I gave him a huge needlepoint needle and embroidery floss. With a little help, he did it all, and was SO excited to use a big sharp (not really) needle!
LikeLike
What wonderful tutorial great job and such a great gift you gave us thank you so much!
LikeLike
oh your decorations are just beautiful!!! what a lovely tree and such pretty colours.
LikeLike
Divine!
LikeLike
Adoro seu blog e gostaria de parabenizá-la pelo tutorial de ornamentos natalinos e pelos lindos trabalhos postados no blog por você. Desejo que em 2009 você tenha muitas realizações e prosperidade. Moro no Brasil e sempre que posso passo por aqui. Parabéns e feliz 2009.Beijos,Maria José (mjune_21@hotmail.com)
LikeLike
estas manualidades son muy faciles de hacer gracias http://fieltro.net/
LikeLike
Querida,
Parabéns pelo seu tutorial tão especial, adoro seu trabalho, as cores que você usa e toda a sua criatividade!!!
Coloquei seu link no meu blog, muito obrigada por compartilhar!!!
Beijosss
Carine
LikeLike
Hi! I love the whole red and aqua mix…beautiful christmas ornaments…you have inspired me!
LikeLike
Dear Concha,
Wonderful your page and lovely all your works!! Congratulation for your creative ideas.
I would like to recommend to visit: la habitacion de kate in Malaga (South of Spain) where you can swap impressions about craft and maybe sell some of your nice articles.
Enjoy Christmas time!!
LikeLike
Lovely! Exactly what I was looking for…thanks!
LikeLike
Gracias por este post, me ha servido de inspiración y de ayuda. Muchas gracias
LikeLike
I think I'll make mine in white on white for Christmas! Any idea if cats like to eat them? (My cats eat all my Christmas decorations.)
LikeLike
Ola
Lindos trabalhos, conheci seu blog atraves da Carine!
Adorei!
bjs
Mi
LikeLike
I'm headed to the store to make these! I also will do trees!
LikeLike
Simplesmente encantador! Parabéns, Concha!
LikeLike
Wow! Kid friendly, I love it!;)
LikeLike
Olá Concha! Acabo de descobrir o teu blog, e gostei muito dele! Eu tambem estou a proponher um nada feito a man aos meus leitores! 🙂
Um saúdo desde a Galiza (Espanha)
LikeLike
estan hermosas las cosas que haces, felicitaciones
LikeLike
Hope to try this!
LikeLike
I love this!! So gorgeous 🙂 xx Marisa
LikeLike
I mentioned these on my blog today at: http://controllingcraziness.blogspot.com/2011/12/diy-no-mess-glittered-ornaments.html#more
Love the cute colors you used.
LikeLike
Thanks for sharing, I had lots of fun making the hearts. I put them here so you could see.
http://www.flickr.com/photos/30535399@N08/sets/72157628708290369/
LikeLike
Wow! Beautiful handcrafted..
LikeLike
I like that star ^_^
LikeLike
Que bellezas de adornos, voy a probar como que quedan.
Gracias,
VERO
LikeLike
Thanks, I link you in my blog, DIVERSIDADES
LikeLike
Thank you for the great ideas and tutorial. These will make great gifts for my family and friends at Christmas. Bless you.
LikeLike
شركة رش مبيدات بالمدينة
شركة رش مبيدات بالدمام
شركة تخزين أثاث بمكة
شركة رش مبيدات بالدمام
شركة كشف تسربات
شركة تخزين اثاث بالمدينة
شركة كشف تسربات
شركة رش مبيدات بجده
شركة رش مبيدات بالخرج
شركة رش مبيدات بالدمام
شركة تخزين اثاث بالدمام
شركة عزل خزانات بالرياض
شركة مكافحة حشرات بالرياض
شركة تخزين اثاث بالرياض
شركة نقل اثاث الرياض
شركة كشف تسربات المياه بالرياض
شركة تنظيف بيارات بالرياض
شركة تسليك مجاري بالرياض
شركة جلي بلاط بالرياض
شركة تنظيف كنب بالرياض
LikeLike
شركة تنظيف منازل بالرياض
شركة عزل خزانات بالرياض
شركة مكافحة حشرات بالرياض
شركة تخزين اثاث بالرياض
شركة رش مبيدات بالرياض
شركة نقل اثاث الرياض
شركة تنظيف خزانات بالرياض
شركات نقل وتغليف اثاث
شركة تنظيف واجهات زجاج بالرياض
شركة تنظيف بالدمام
شركة تنظيف فلل بالدمام
شركة تنظيف منازل بالدمام
شركة تنظيف شقق بالدمام
شركة مكافحة حشرات بالدمام
شركة تسليك مجاري بالدمام
LikeLike
شركة تنظيف موكيت بالدمام
شركة تنظيف بيارات بالدمام
شركة تنظيف خزانات بالدمام
تنظيف فلل بالرياض
شركة تنظيف شقق بالرياض
شركة تنظيف بيوت بالرياض
عزل خزانات بالرياض بالرياض
شركة رش مبيدات بالرياض
شركات نقل عفش في الرياض
شركة تنظيف موكيت بالرياض
شركة تنظيف فلل بالرياض
شركة نقل اثاث بالدمام
LikeLike