


[scroll down for English]
Na nossa casa neozelandesa, as divisões eram quadradas com tectos muitos altos e desde logo senti necessidade de preencher aquela enorme expansão de paredes. Há uns anos escrevi um post sobre a importância de pendurar nas paredes de nossa casa a nossa própria história, e continuo a sentir-me confortável em ambientes bem recheados (não sou de todo uma minimalista). Pois bem, há paredes em que essa tarefa é fácil (um quadro colocado entre duas janelas ou centrado em cima de uma cómoda, por exemplo), mas outras há que constituem verdadeiros desafios.
No caso da nossa sala, a primeira parede continha a lareira e um passa-pratos, a segunda era inteiramente composta por janelas, na terceira fizemos uma galeria de quadros (num próximo post mostrar-vos-ei como ficou quando finalmente a completámos) e a quarta… bem, essa rapidamente nos mostrou que era “a parede problemática”.
Nos meus habituais devaneios de grandeza (já os conhecem — quando começo a pensar “nas tias”, nos sótãos e nos armazéns que nunca existiram) imaginei que poderia lá pendurar uma colcha de Viana (antiga e de casal, pois claro), ou um tapete de Arraiolos, ou quem sabe um tecido antigo… mas, dada a ausência de uma “peça têxtil” com a dignidade e antiguidade necessárias, resolvi fazer eu algo com as minhas próprias mãos.
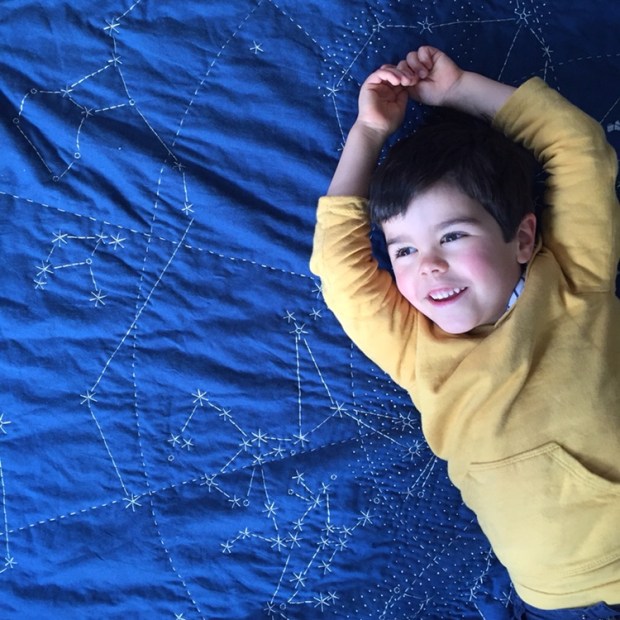
Já andava a namorar os quilts-mapa do Haptic Lab há uns tempos e um dia percebi que eles não só vendem os moldes, como tinham algo ideal para a nossa casa: um desenho das constelações do hemisfério sul para bordar numa manta de 180 x 180 cm.
E assim o fiz. Encomendei o desenho, comprei os tecidos (para frente um algodão — shot cotton — com fios azuis-escuros e pretos, para trás um tecido branco), o enchimento para quilts (de algodão) e a linha de bordar (escolhi um fio de viscose — rayon — prateado da DMC).
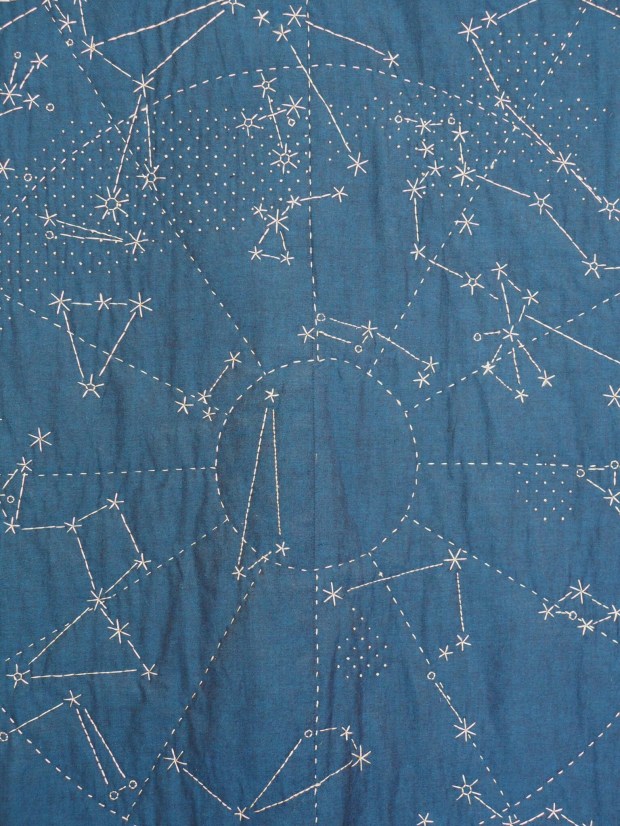
A parte mais difícil do processo foi o mise en scène, ou seja, fazer a sanduíche do quilt e depois prender-lhe por cima o desenho das constelações. O desenho vem impresso numa entretela fina que, no caso destes quilts maiores, é composta por duas folhas de entretela que se encontram no meio e que idealmente encaixariam uma na outra na perfeição, mas que, pelo menos no caso do meu molde, estavam desencontradas no centro. Essa foi a primeira e, pensando bem, a única dificuldade deste projecto hercúleo. O resto foi demorado mas nunca difícil.
Presas e alinhavadas as quatro camadas (tecido de trás, enchimento, tecido da frente e entretela), fui buscar o bastidor maior que tinha em casa (onde pendurei aquela rena “empalhada” que fiz há uns anos) e comecei a bordar. O bordado faz-se por cima da entretela, que no fim de retira com cuidado, e os pontos são muito simples: ponto atrás e nós franceses, nada mais. [Podem espreitar as instruções aqui.] A linha de viscose que escolhi não foi a mais fácil de usar (aliás, só quando cheguei a casa é que me apercebi de que não tinha comprado uma linha normal de algodão… mas a verdade é que a viscose tem um brilho muito cósmico e resulta bem quando se está a bordar estrelas) mas nada do outro mundo.
Quanto tempo demorei a completar este bordado? Dois ou três meses. Adoro projectos grandes que se fazem com calma ao serão, uma ou duas horas por noite, enquanto vejo um filme ou um episódio de uma série na televisão. Não recomendo que embarquem num projecto destes em pleno Verão, como eu fiz, porque o quilt é grande e pesado e faz imenso calor!
Agora que voltámos a viver na Europa, fico contente por ter esta recordação do céu estrelado do hemisfério sul. É um céu magnífico, que dá dez a zero ao céu do hemisfério norte, e que sempre me fez pensar nas grandes aventura marítimas do passado. O Haptic Lab também vende o desenho do céu do hemisfério norte, assim como um mapa-mundi e as plantas de muitas cidades à volta do mundo: espreitem aqui.
***
In our NZ villa we had square rooms and high ceilings and ever since we first moved I felt the need to fill up those large walls. I once wrote a post about the importance of hanging personal objects on our walls and I still feel most comfortable in layered environments (a minimalist I am not). There are walls in which that task is easily accomplished (for instance, a picture hung between two windows or centered over a chest of drawers) but some walls can be a lot trickier.
Take our sitting room: the first wall had the fireplace and a dumb waiter, the second was entirely taken up by a big bay window, on the third one we did a gallery wall type of arrangement (I’ll show you how it ended up looking on my next post) and the forth wall… well, that quickly revealed itself as being “the problem wall”.
In my usual dreams of grandeur (I’ve already told you about them — when I start longing for “the aunts”, the crammed attics and outbuildings that never quite existed) I thought I’d use that wall to display a lovely old embroidered bedspread or a rug or a precious piece of antique fabric… however, due to the lack of a dignified “textile piece”, I decided to just make something with my own hands.
I’d been eyeing Haptic Lab’s map-quilts for a while and one day I discovered that not only do they sell DIY kits, they had the perfect thing for me: a template of the constellations of the Southern Hemisphere sky to embroider onto a 72 x 72 in. quilt (180 x 180 cm).
And that’s how I embarked upon this herculean project. I ordered the template, bought the fabrics (a navy and black shot cotton for the front and some white plain cotton for the back), a piece of cotton wadding and a few skeins of embroidery thread (I picked a silver DMC rayon).
The trickiest part of the process was the whole mise en scène, that is, making the quilt sandwich and securing the embroidery template on top of it. The template is printed onto a thin paper-like interfacing which, in the case of these larger quilts, is actually made out of two interfacing pieces-that meet in the centre and that ideally are perfectly matched. Unfortunately, in my case they didn’t match and that was the only difficulty I faced in this entire project. The rest took time but wasn’t difficult at all.
Once the four layers (backing, wadding, top and template) were all pinned and basted together, I got the largest embroidery hoop I could find at home (I actually had to steal it from that stuffed reindeer in the play room) and started embroidering. You make your stitches over the interfacing, which you then tear away gently at the end, and the stitches are very simple: it’s just back stitch and French knots. [You can have a look at the general instructions here.] The rayon thread I picked wasn’t the easiest (actually, I only realised it was rayon and not regular cotton once I got home from the shop… but it does have a nice cosmic sheen to it that’s perfect for embroidering stars) but it was still perfectly manageable.
How long did it take me to complete this project, you ask? Two or three months. I love working on big projects in the evenings while I watch a film or a series on TV. Just don’t start working on it in the summertime like I did — this quilt is big and heavy and you’ll be very hot!
Now that we’re back living in Europe I’m glad I’ve got this memento of the Southern Hemisphere sky. It’s an absolutely magnificent sky, much more impressive than the one we see here in the Northern Hemisphere, and it always made me think of the great maritime adventures of centuries past. Haptic Lab also sell a template for the Northern Hemisphere constellations, as well as a world map and lots of city plans: check them all out here.