Comidas e Bebidas Infantis :: Kids’ Party Food and Drink

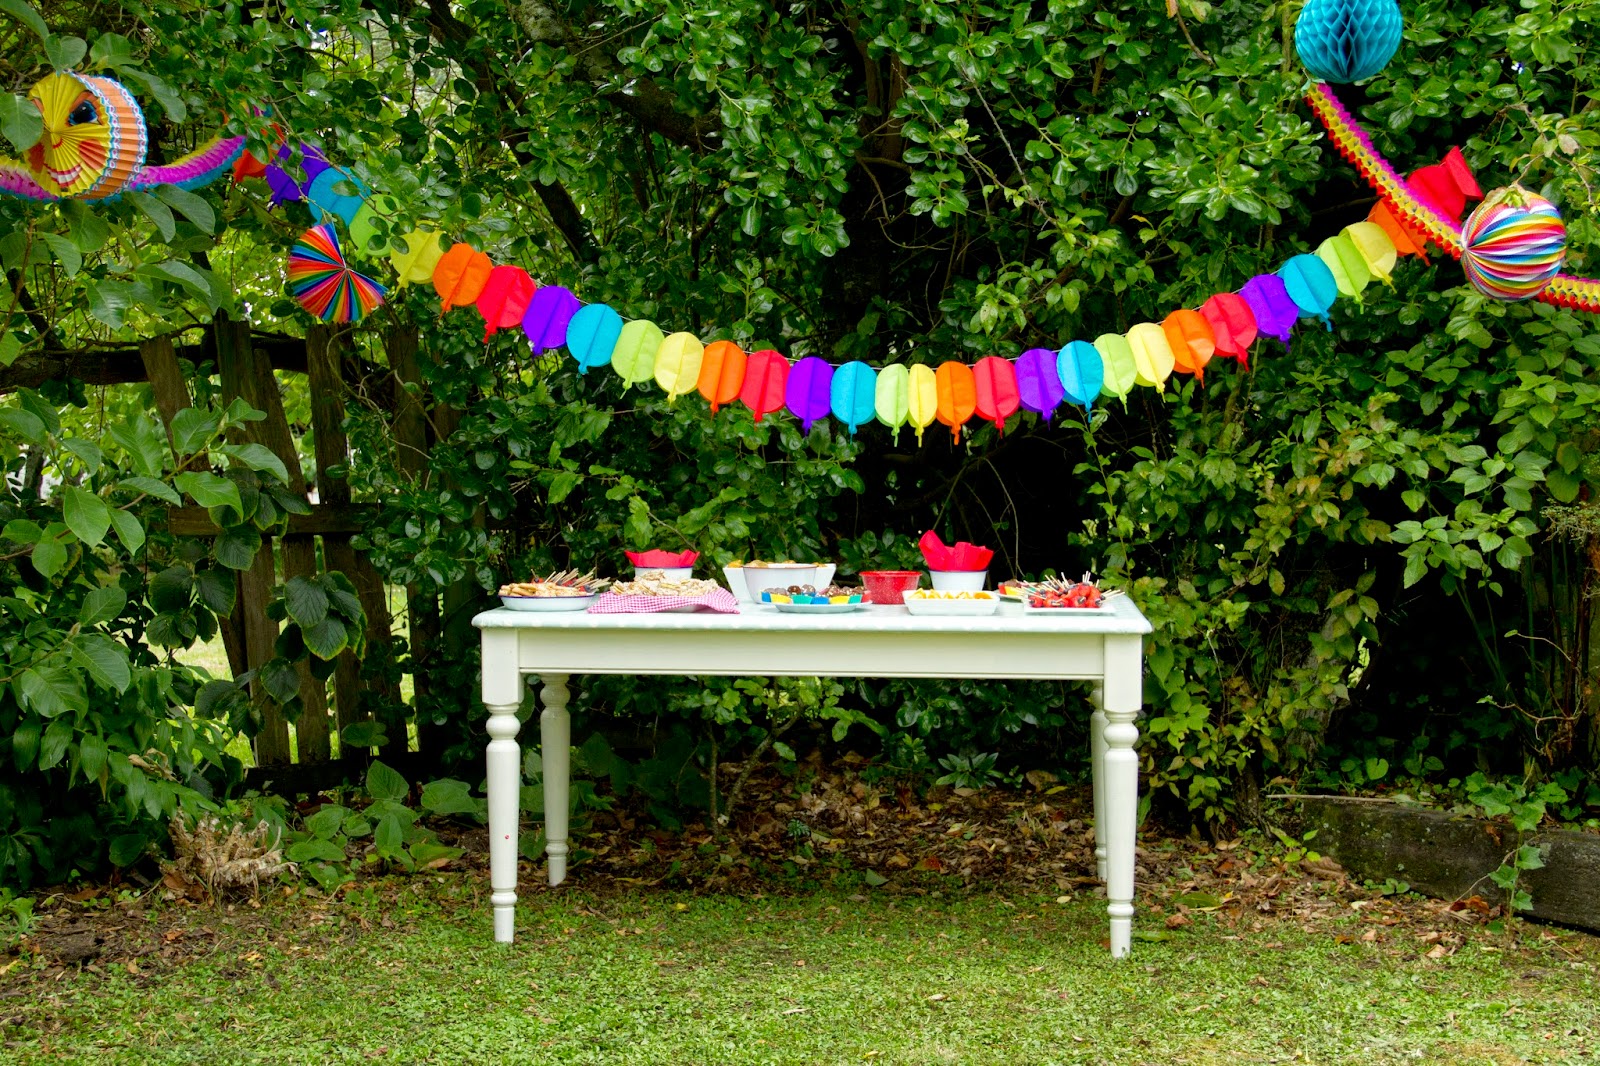
No meu último post contei-vos como montei a festa do Rodrigo, hoje vou falar-vos na comida. Devo dizer que, no que toca a festas infantis, eu parei nos anos 80. Não há grandes sofisticações por aqui — as minhas escolhas recaíram em memórias de infância e em sugestões de algumas amigas sensatas com filhos mais velhos que os meus, bem como naquilo que o Rodrigo me pediu. A saber:
– sanduíches de queijo: como cá não há daquelas bolinhas enfarinhadas óptimas, usei pão de forma e cortei as sanduíches com um cortador de bolachas em forma de flor;
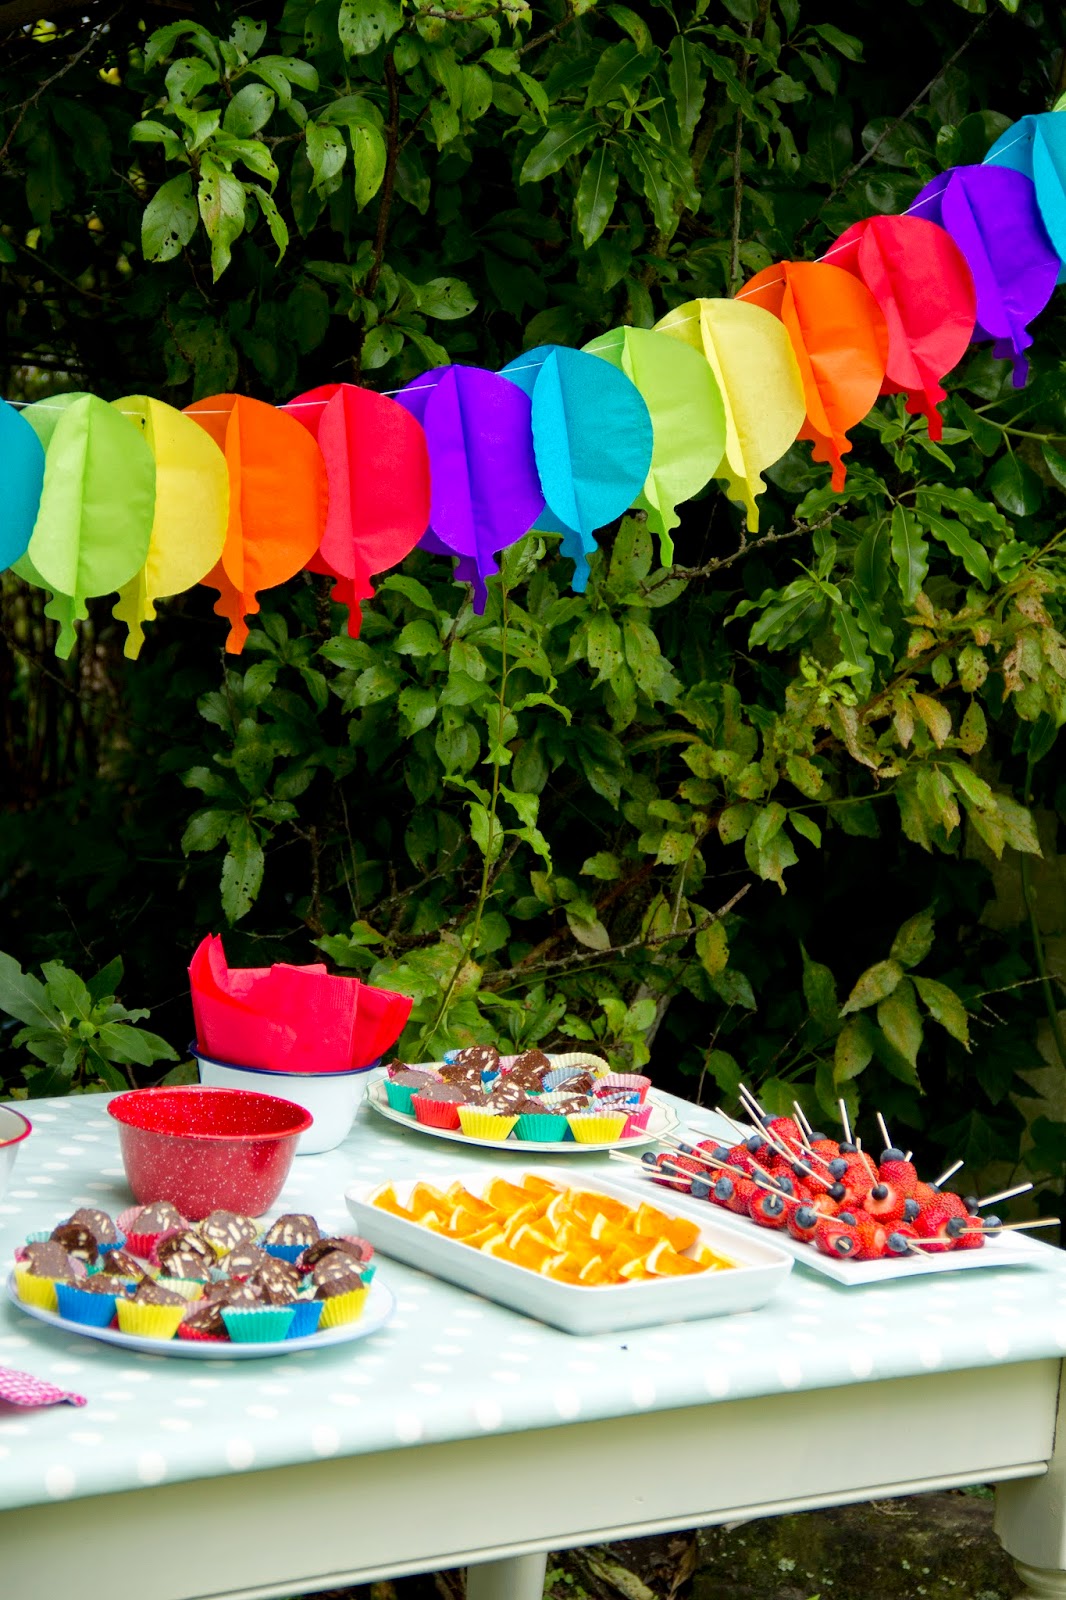
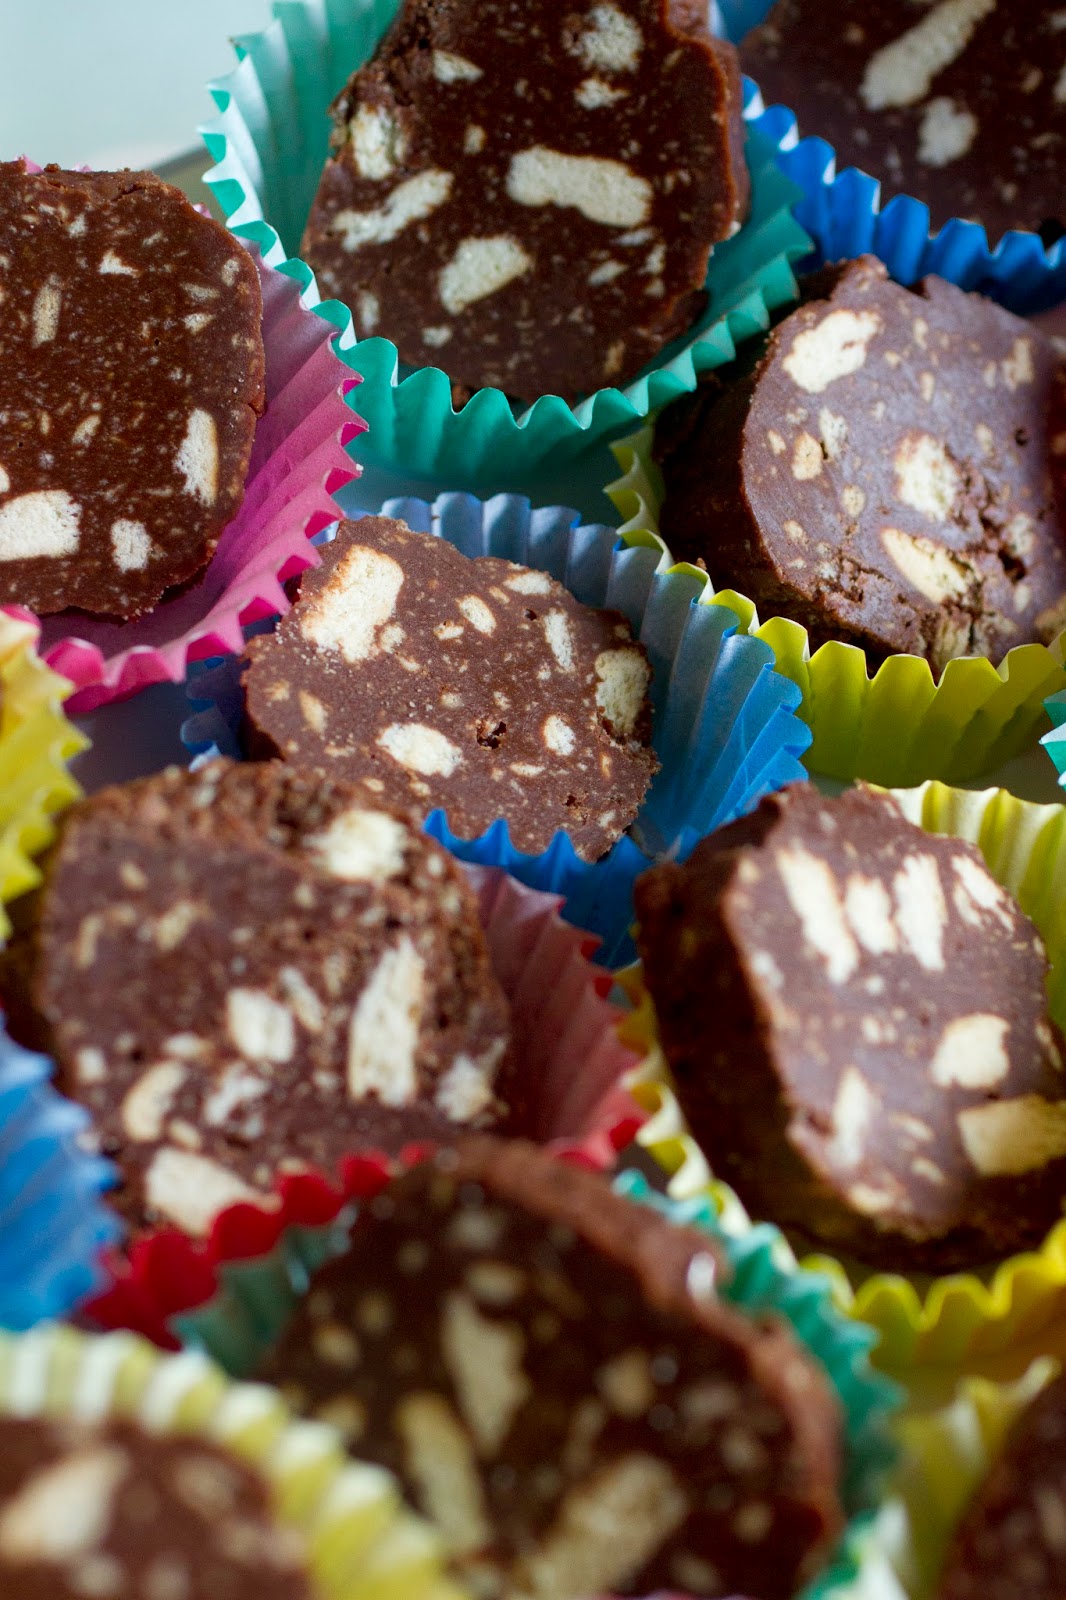
– salame de chocolate (uma iguaria desconhecida aqui na NZ): em vez de fazer um rolo grande, fiz três pequenos, que depois cortei em rodelas e servi em cima de formas de papel (segui esta receita com pequenas alterações);
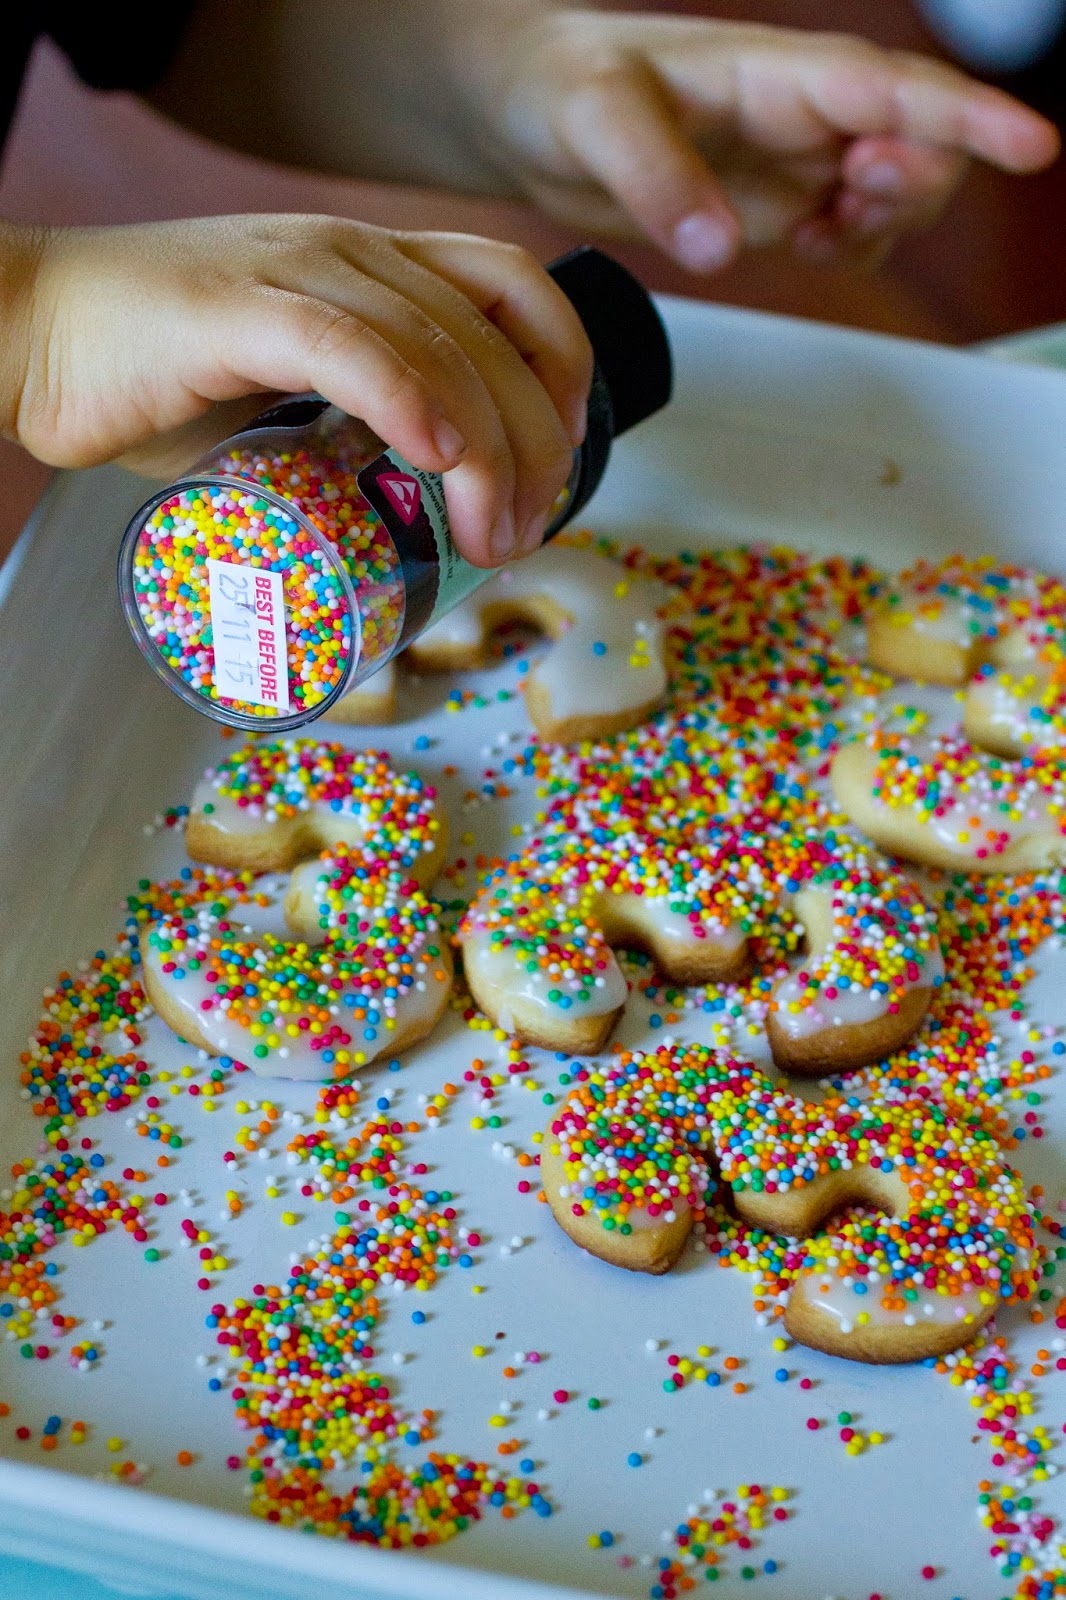
– bolachas em forma de número 3: experimentei uma receita nova de bolachas de manteiga e gostei mais desta do que daquela que usei para as bolachas de Natal. Como cobertura, fiz uma pasta de icing sugar e água e depois salpiquei-as com sprinkles coloridos.
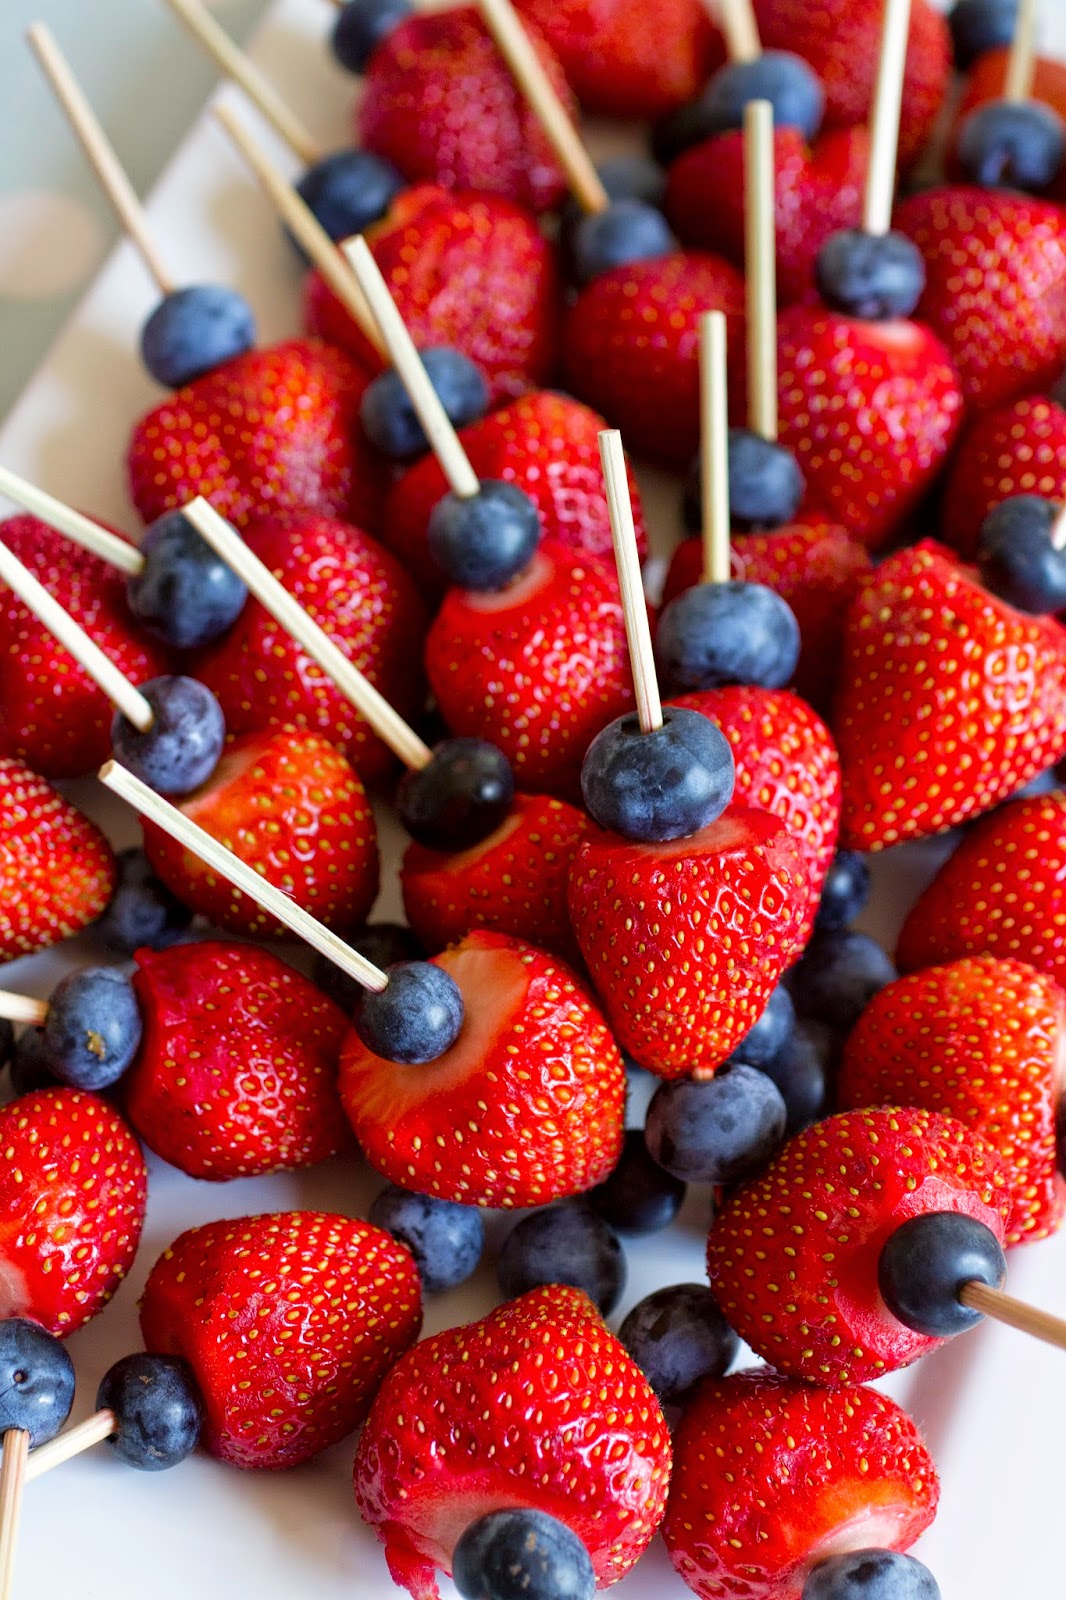
– espetadas de morangos e mirtilos;
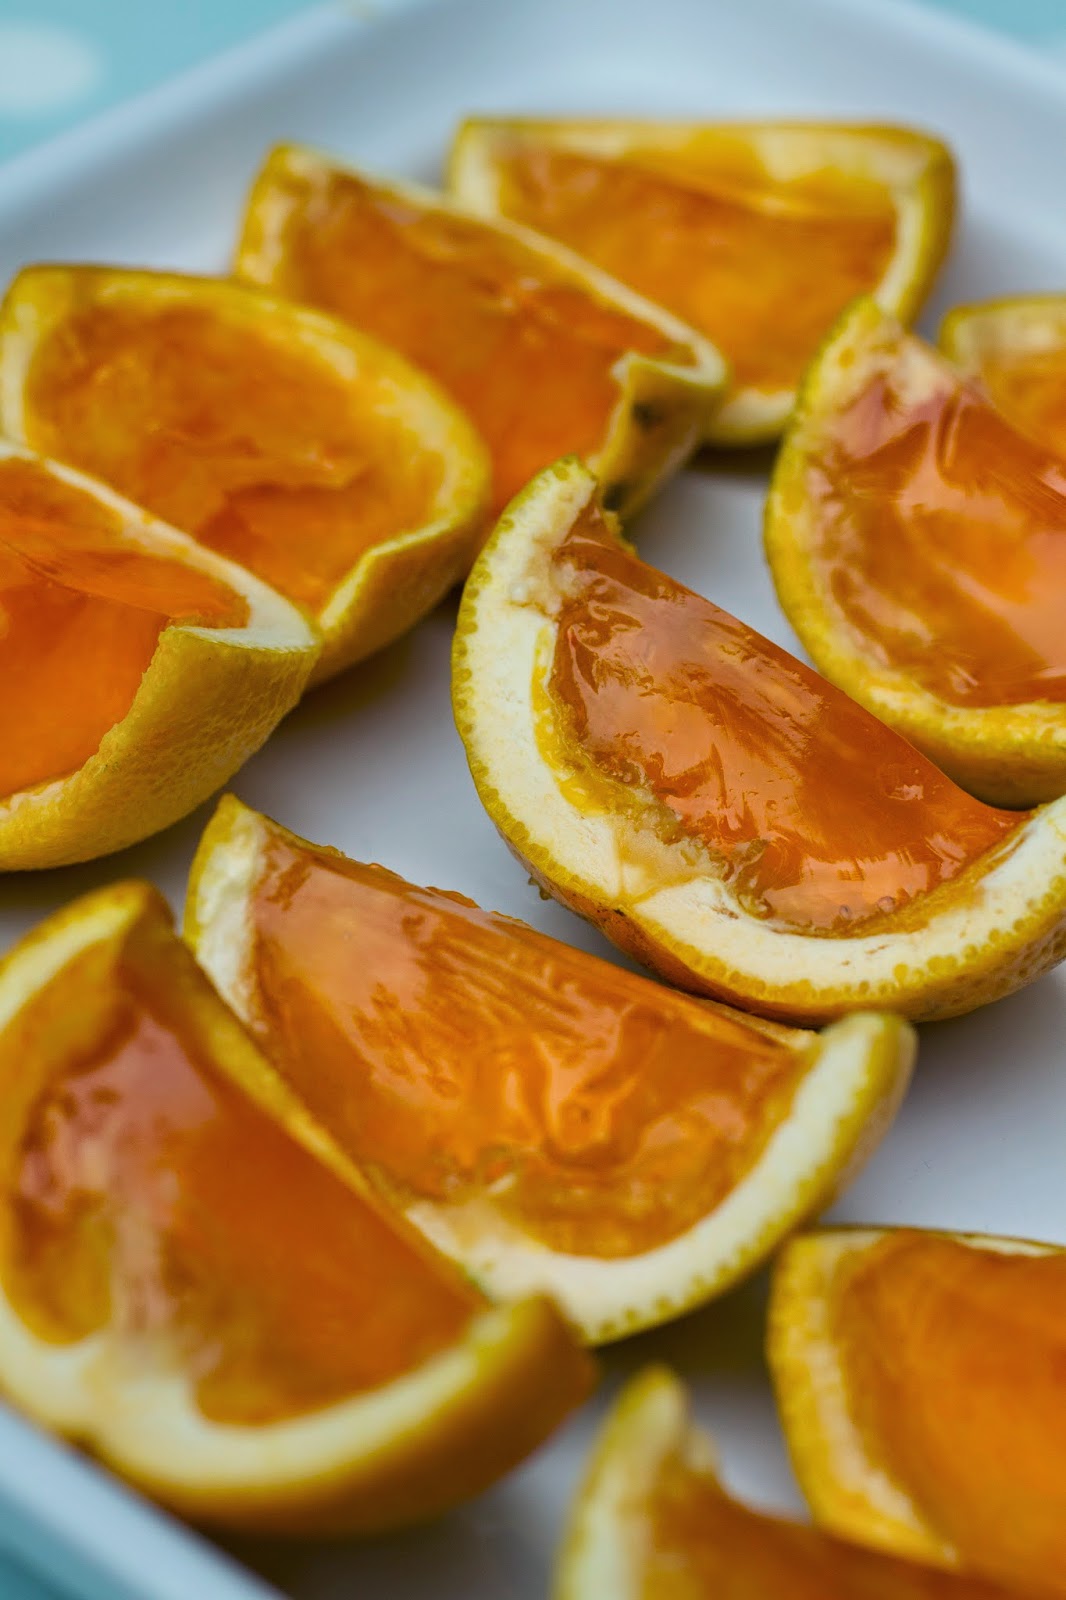
– quartos de gelatina de laranja: o grande clássico das festas infantis dos anos 80. Lembram-se disto? A minha mãe fazia-os sempre. Cortam-se as laranjas ao meio e, depois de espremidas, enchem-se com gelatina acabada de fazer. Põem-se no frigorífico e, no dia seguinte, cortam-se aos quartos usando uma faca bem afiada. Na semana anterior à festa experimentei fazer uma versão mais saudável com sumo de laranja e gelatina natural em pó (cá não há folhas) e ficou horrível (juro que sabia a bife), por isso acabei por usar gelatina de pacote;
– uma taça de smarties;
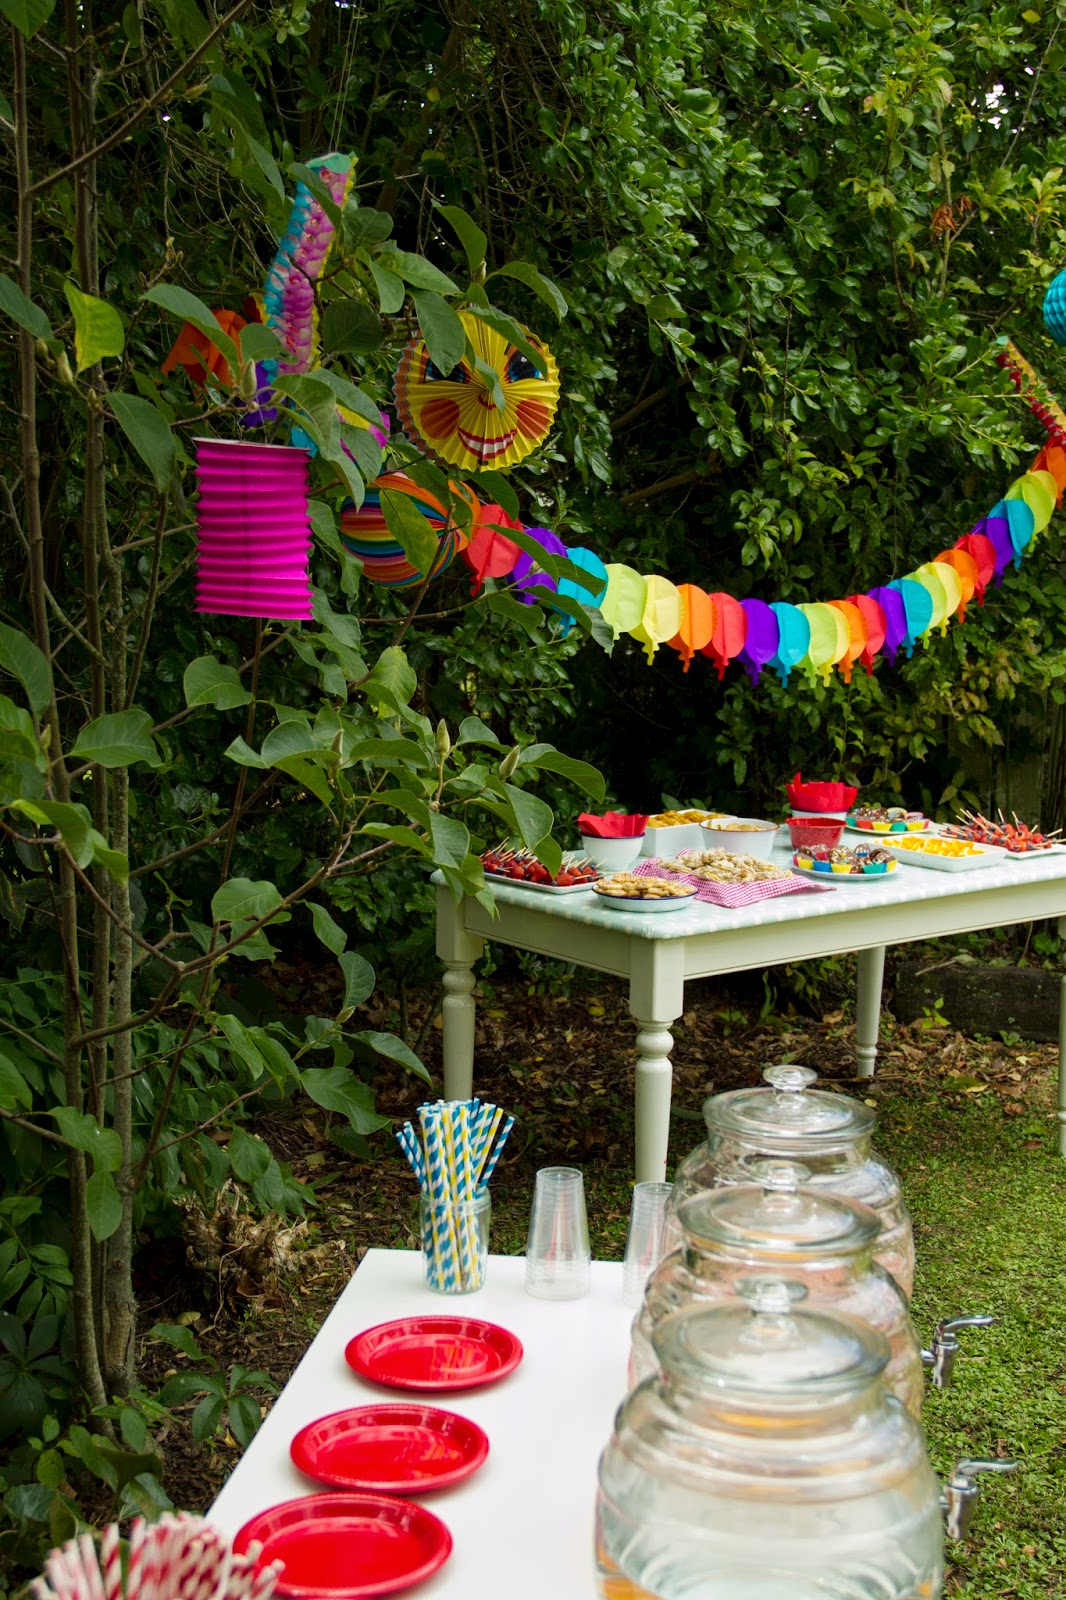
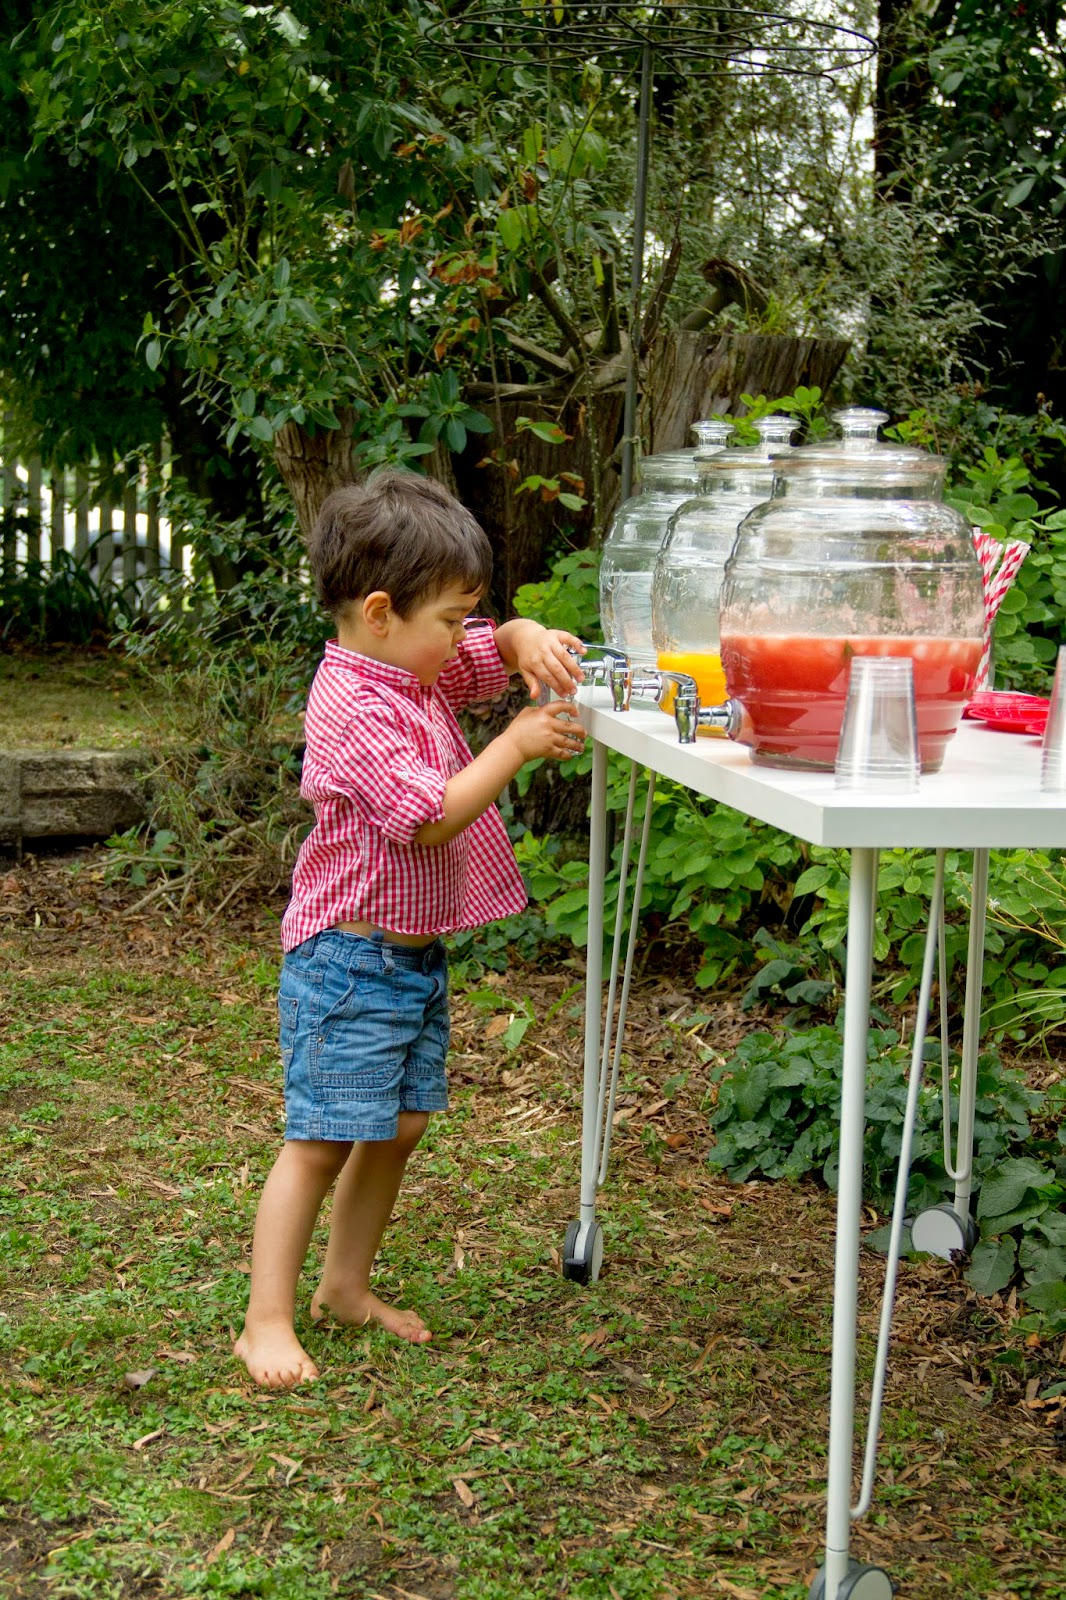
– sumo de laranja (feito com todas aquelas laranjas que espremi para fazer os quartos de gelatina);
– sumo de melancia e framboesa (receita deste livro — obrigada, Soraia, pela sugestão);
– água.
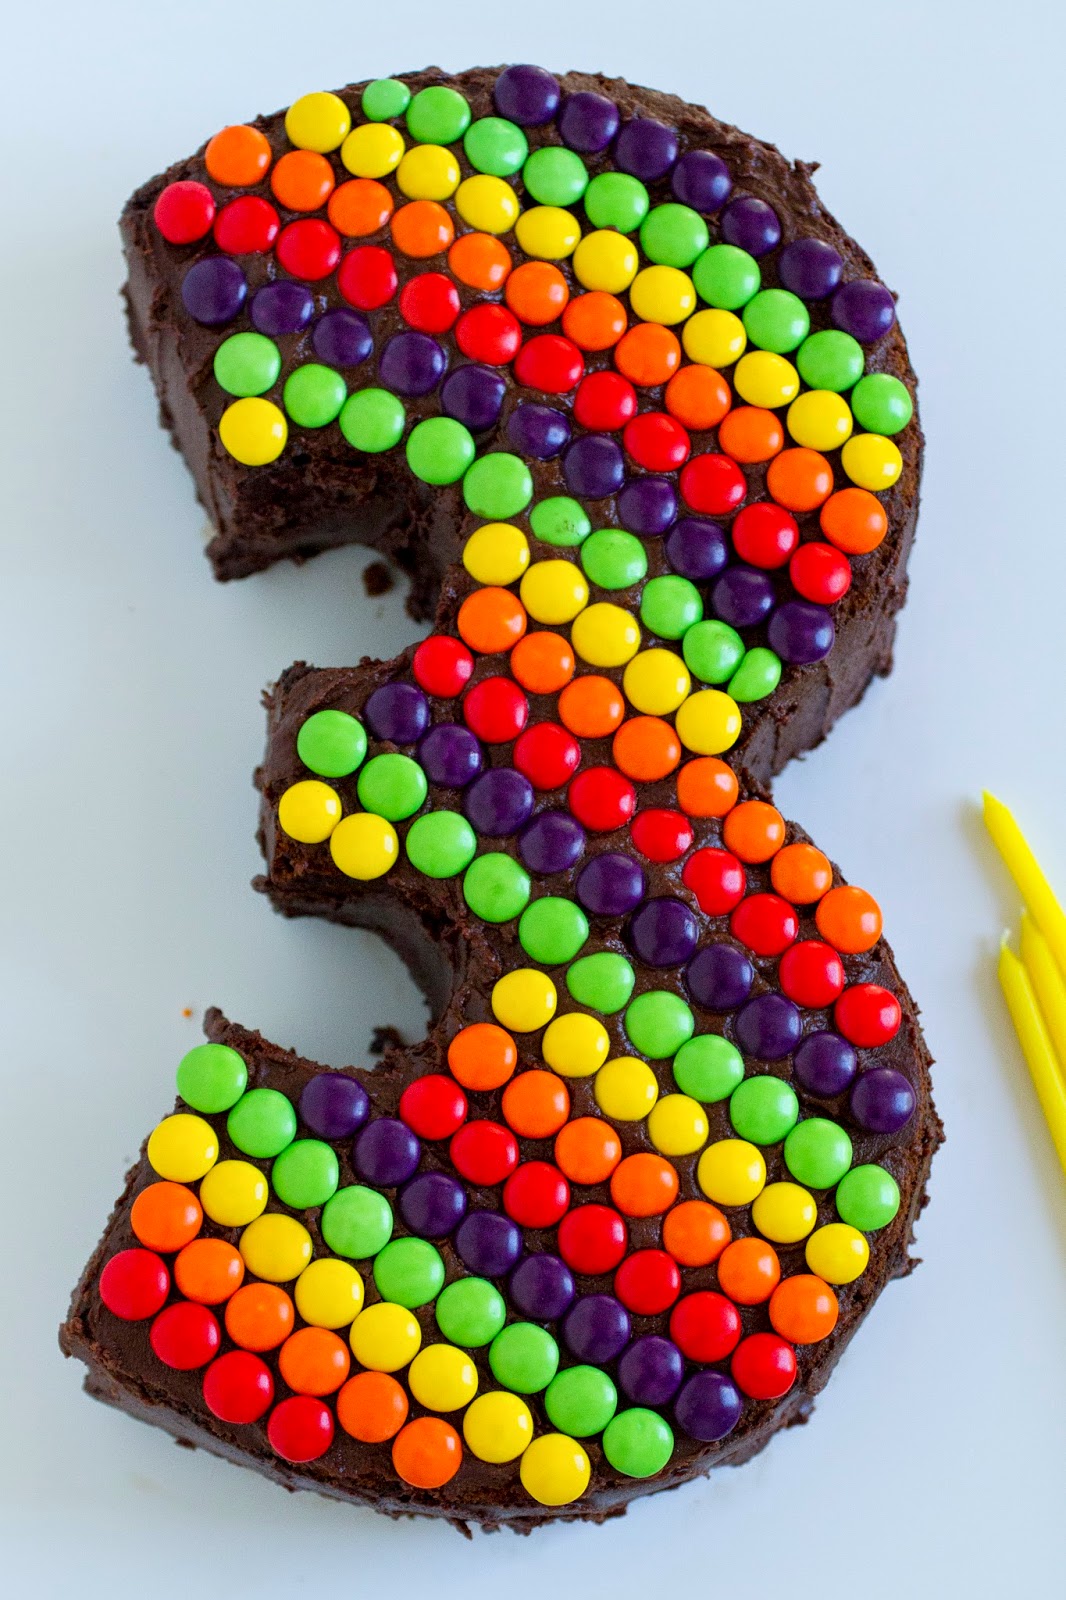
Para a festa cá em casa, o Rodrigo pediu-me um “bolo amarelo com morangos”, por isso fiz-lhe um pão-de-ló coberto com chantilly caseiro e morangos. Mas quem escolheu o bolo para levar para a escola fui eu! Fiz-lhe um bolo de chocolate e laranja numa forma que aluguei na padaria aqui da vila, e depois cobri-o com smarties (a ideia veio daqui). Segui esta receita mas acrescentei mais duas ou três colheres de sopa de icing sugar à cobertura, de maneira a torná-la mais espessa (para que os smarties se aguentassem no sítio).
OK, so I’ve told you about Rodrigo’s party set up — now let’s hear about the food and drink! I must say that when it comes to children’s parties, I’m proudly stuck in the 80s. There are no elaborate affairs around here — I based my choices on childhood memories and suggestions given to me by no-nonsense friends who have older kids, as well as Rodrigo’s requests. Here goes:

– cheese sandwiches: just sliced bread and cheese, which we then cut out using a flower shaped cookie cutter; 

– chocolate salami: this is a childhood staple in Portugal — you make a dough using powdered chocolate, egg yolks, sugar and Marie biscuits, you shape it like a log before putting it in the fridge for at least 12 hours and then you slice it up. I made 3 slim logs instead of a thick one and placed each small rounded slice on a mini muffin paper case;

– number 3 biscuits: I tried out a new recipe for sugar biscuits and liked it much more than the one I used for my Christmas biscuits. I iced them with a simple paste of icing sugar and water and then we scattered lots of colourful sprinkles on top.

– strawberry and blueberry skewers;

– orange jelly quarters: this was a great classic in Portuguese kids’ parties back in the 80s. My mother always made them! You cut the oranges in half, squeeze out the juice and then fill the empty shells with hot orange jelly. Then they go in the fridge to set and the following day you slice them up into quarters. A few days before the party I made a trial run with a healthy version of the jelly (real orange juice and powdered unflavoured gelatine — I couldn’t find any gelatine leaves) and it turned out absolutely revolting (it literally tasted like beef), so I just went with the packaged stuff instead [jell-o].

– a bowl of smarties;

– orange juice (from all those oranges I used for the jelly quarters);

– watermelon and raspberry juice (recipe from this book — thank you, Soraia, for the suggestion);

– water.

Rodrigo asked for a “yellow cake with strawberries” so I made him pão-de-ló (Portuguese sponge cake) covered with whipped cream and topped with a handful of strawberries. However, the cake he took to preschool was chosen by me… and I went to town with it! Inspired by this cake, I rented a number 3 tin from our local bakery and baked a chocolate and orange cake, which I then covered in smarties. I followed this recipe but added another 2 or 3 tablespoons of icing sugar to the chocolate topping (in order to make it thicker so that the smarties would stick properly to the cake).

(photos: © Constança Cabral)

Festa dos 3 Anos :: 3rd Birthday Party

Para a festa dos 3 anos do Rodrigo fiz um pequeno arraial aqui no nosso jardim. O tempo não estava nada de especial — se tivesse sido em Portugal, acho que nunca teria feito a festa lá fora, mas visto que estes kiwis são bastante mais resistentes ao vento e às temperaturas baixas do que nós portugueses, resolvi arriscar e acabei por não me arrepender. As crianças divertem-se sempre muito mais fora de casa, não acham?
O nosso jardim é a descer e tem vários patamares. No primeiro criei um recanto com colchões, almofadas, poufs, um tapete e alguns brinquedos e livros. No patamar seguinte coloquei duas mesas, uma com comida e a outra com bebidas (amanhã mostro-vos os comes e bebes em pormenor). As decorações de papel são todas portuguesas (as mesmas que usei quando fiz um Santo António dentro de casa, lembram-se?).
Foi uma festa bastante simples mas muito colorida, com tudo feito em casa conforme os gostos e pedidos do Rodrigo. Ele estava entusiasmadíssimo e fartou-se de ajudar, gostei imenso de assistir à alegria e ao empenho dele. Para o ano há mais!
Rodrigo’s 3rd birthday party was a Portuguese-inspired garden party at home. The weather wasn’t great — had this been in Portugal I would never had set up everything outside but since Kiwis are much more tolerant of wind and low temperatures than us Portuguese, I decided to risk it and I’m so glad I did. Children always have more fun outdoors, don’t you think?

Our garden is on a slope and it has different levels. On the first level I created a sitting and playing area with a couple of mattresses, some cushions, bean bags, a rug and a few toys and books. On the next level I placed two tables with food and drinks (I’ll tell you more about that tomorrow). The paper decorations are all Portuguese (the same ones I used when I once celebrated St. Anthony’s day indoors, do you remember?).

It was a simple affair but a colourful one. I made everything according with Rodrigo’s tastes and requests, he was so excited! He was so helpful, committed and happy, it was truly lovely to watch. 
(photos: © Constança Cabral)

Por Aqui :: Around Here

Por aqui as últimas semanas têm sido bastante preenchidas. O Pedro fez 6 meses e o Rodrigo fez 3 anos, arranjámos dois armários, cosi bastante, acolhemos uma visita inglesa e organizei a minha primeira festa infantil. Agora vamos de férias de para a praia (esperemos que o tempo seja nosso amigo) e estarei de volta daqui a uma semana. Até breve!
Around here these last few weeks have been filled with happy things. Pedro turned 6 months and Rodrigo is now a 3-year-old, we revamped two cupboards, I sewed a lot, we had an English guest and I threw my very first children’s party. Now we’re going on holidays to the beach (let’s hope the weather is nice) and I’ll be back here next week. See you soon!

(photos: © Constança Cabral)

Refashion :: Boy to Girl Dungarees

Quando estava grávida do Pedro, comprei estas jardineiras numa loja de caridade aqui das redondezas — achei que, por apenas NZD$2, ficava com uma peça de roupa clássica e fresca (o tecido é bem mais fino do que parece nas fotografias). No entanto, quando — meses mais tarde — fui buscar à garagem toda a roupa de bebé, encontrei umas jardineiras quase iguais… por isso, pus estas de parte e não pensei mais no assunto.
Há uns tempos perguntaram-me no Facebook se eu tinha ideias para transformar a roupa de rapaz em roupa de rapariga (por exemplo, quando as irmãs ou primas mais novas herdam a roupa dos rapazes mais velhos). Apesar de achar que as raparigas podem perfeitamente usar as mesmas roupas que os rapazes, sobretudo se essas peças forem misturadas com outras mais femininas, fiquei a pensar na pergunta. E, uns dias mais tarde, resolvi responder ao desafio.
When I was pregnant with Pedro I bought these dungarees in a local charity shop — I figured that, for only NZD$2, I was getting a timeless and cool piece of clothing (the fabric is actually much thinner than it looks in the photos). However, when — a few months later — I rummaged through all the baby clothes that I had stashed away in the garage, I found an almost identical pair… so I put these aside and forgot about them.

A few weeks ago, someone asked me on my Facebook page for ideas on how to transform boys’ clothes into girls’ clothes (i.e. when a younger sister inherits her older brother’s clothes). Even though I believe that girls can wear the same clothes as boys, especially if they’re mixed with some more feminine items, the question got me thinking. And, a few days later, I decided I was up for the challenge.

Escolhi um tecido florido nos mesmos tons das jardineiras (Liberty é sempre uma aposta segura) e usei-o para fazer as alças, o bolso central e as abas dos botões na cintura, assim como para debruar as pernas e os bolsos atrás. Também substituí os botões, fechei a braguilha e aproveitei para aplicar molas entre as pernas (assim). 
Fiz esta transformação a pensar no bebé de uma grande amiga minha que, por coincidência, nasceu hoje. Bem-vinda ao mundo, querida Maria do Mar! 
[claro que não resisti a prová-las no Pedro]
I picked a floral fabric in the same tones as the original dungarees (you can never go wrong with some Liberty) and used it to make new straps, button tabs and the front pocket, as well as binding for the legs and back pockets. I also replaced the buttons, stitched over the faux fly and added snap tape for easier nappy changing (tutorial).

I made these alterations for the baby of a great friend of mine, who (by coincidence) was born today. Welcome to the world, dearest Maria do Mar!

[of course I couldn’t resist trying them on Pedro]
(photos: © Constança Cabral)

Follow my blog with Bloglovin

Oliver + S Bucket Hat

Voltei a fazer um chapéu para o Rodrigo com o molde (gratuito) Reversible Bucket Hat. Este foi o quarto bucket hat que fiz para ele (podem ver as versões para 6 meses aqui e para 1 ano e meio aqui) e tenho a certeza de que não terá sido o último. 
Não sigo as instruções à letra, porque evito coser à mão sempre que consigo arranjar uma alternativa. Neste caso, a alternativa é construir o chapéu como se de um saco se tratasse: fazer o exterior, fazer o forro, colocá-los um dentro do outro, direito com direito, coser a toda a volta deixando uma abertura, virar para o direito e pespontar. Também incluo sempre um elástico — tanto a Nova Zelândia como Portugal são países ventosos (embora o vento na NZ esteja noutro campeonato) e, apesar de o elástico não ser muito bonito, prefiro ver o chapéu na cabeça do Rodrigo do que no chão. É certo que, com a inclusão do elástico, o chapéu deixa de ser reversível, mas dado que fiz o forro igual à parte de fora do chapéu…
Já experimentaram este molde? Dá para adaptar a rapazes e raparigas e funciona sempre. Recomendo-o vivamente!
I’ve made another Reversible Bucket Hat (free pattern) for Rodrigo. It’s the fourth bucket hat I’ve made so far (check out the previous versions at 6 months and 1.5 years old) and I’m sure this one hasn’t been the last.

I don’t follow the instructions to the letter because I avoid hand-sewing whenever I can find a suitable alternative. In this case, the alternative is to construct the hat as if it were a bag: you make the exterior and the lining separately,  sew them right sides together, leaving a small opening, then turn the whole thing through the opening and topstitch all around the brim. I also like to include a piece of elastic, as both New Zealand and Portugal are windy countries (although NZ clearly wins in the wind department). Even though the elastic isn’t exactly pretty, I’d rather see the hat on Rodrigo’s head than on the floor. It’s a fact that the inclusion of the elastic prevents the hat from being reversible but since I used the same fabric on the exterior and on the lining…

Have you ever used this pattern? You can easily adapt it suit to boys and girls alike and it always turns out great. I highly recommend it!
(photos: © Constança Cabral)

Arranjo de Flores à la Bollywod :: Bollywood-Style Flower Arrangement


Nesta casa onde agora vivemos, tivemos a sorte de ter herdado um jardim já plenamente estabelecido e cheio de flores diferentes. A antiga dona da casa fartou-se de plantar flores de que gosto imenso, como rosas antigas e sardinheiras perfumadas, mas também escolheu algumas flores que não são bem o meu género — o que é perfeitamente normal, não temos de ter todos os mesmos gostos! Aliás, até tem graça porque assim tenho oportunidade para mexer em flores que nunca teria escolhido à partida, e tentar fazer algo que me agrade com elas. Sair da nossa zona de conforto é sempre positivo, não acham?


In our current house we’ve been lucky enough to inherited a fully established garden filled with exciting flowers. The previous owner planted loads of flowers I absolutely love, like old-fashioned roses and scented pelargoniums, but she also planted ones that aren’t exactly my style — which is fine, of course, as we don’t all have to have the same taste! It’s actually a fun challenge to have access to flowers I wouldn’t have chosen myself, and try to make them work. Getting out of one’s comfort zone is a good thing, right?


Então o que fazer com flores de que não gostamos? Deixá-las morrer no canteiro? Isso é que não! Por exemplo, não sou grande fã destas dálias encarnadas e cor-de-laranja (gosto de outro tipo de dálias, mas estas cores não me convencem). Mas estava decidida a fazer alguma coisa com elas, por isso dei uma volta pelo jardim e apanhei outras flores e folhas que as complementassem, que puxassem pelas cores e formas destas dálias, de maneira a pôr em evidência o seu melhor.
So what to do with the flowers one doesn’t love? Leave them to die in the garden? Of course not! For example, I’m not a big fan of these red and orange dahlias (something to do with the colours… I do like other types of dahlias) but I was decided to make something with them. So I strolled around the garden and picked a few things that would complement them — things that would make the dahlias pop.


Escolhi cores-de-rosa fortes e verdes-ácidos, assim como cabeças de papoilas e outras flores que ainda não estavam completamente formadas. Misturei tudo dentro de uma caneca de estanho e, quando dei por mim, tinha um arranjo bem ao estilo Bollywood!
I chose bright pinks and acid greens, along with some seed pods and a few immature flowers. I mixed it all in a pewter mug and suddenly I had created a Bollywood-style arrangement!


À laia de conclusão: quando não gostamos de alguma coisa, muitas vezes a melhor maneira de fazer com que ela resulte é chamar a atenção para ela, em vez de tentar escondê-la. Uhm… isto é capaz de ser uma tirada demasiado profunda para um simples arranjo de flores!
My conclusion is, when you don’t like something, sometimes the best way to make it work is by drawing attention to it, instead of trying to hide it. Mmmm… that’s quite a statement considering we’re talking about a simple flower arrangement!


(photos: © Constança Cabral)

Lullaby Layette Bodysuit

Gosto de ir mantendo o blog relativamente diversificado, mas ultimamente só me apetece coser! Já percebi que gosto muito mais de coser no Verão do que no Inverno e tenho sentido uma enorme urgência em fazer roupa para o Pedro. Como já aqui disse, agora sei como este primeiro ano passa depressa e esta é a minha oportunidade de lhe fazer coisas de bebé… daqui a um ano já será um rapazinho e a roupa dos rapazes não é muito variada. Sorte a das mães que cosem para raparigas!… Hoje vou falar-vos neste fatinho que fiz para ele.
1. Molde
Lullaby Layette Bodysuit, mais uma vez da marca Oliver + S (sem dúvida, os meus moldes preferidos). Este molde inclui também umas calças, uma camisa e um casaco, mas aquilo que me fez comprá-lo foi o bodysuit. Gosto muito de bebés vestidos com peças inteiras: acho que não há nada mais prático e, por mais que se mexam, continuam sempre com tudo no sítio.
2. Tamanho
O Pedro tem 5 meses e meio, por isso escolhi o tamanho 6-12 meses, mas o fatinho já está pequeno. Já me tinha apercebido de que o Rodrigo é, tal como eu, comprido de tronco, e pelos vistos o Pedro é igual. Vou experimentar alterar o molde, de forma a acrescentar-lhe apenas comprimento na zona da barriga. 
3. Tecido
Usei um algodão fino mas bastante “crisp” (como hei-de descrever em português o toque do tecido? É suave mas com bastante corpo, assim como um tecido de camisa). Não me lembro onde o comprei, acho que foi em Staffordshire, numa loja de tecidos que tinha imensos retalhos a óptimos preços. 
4. Alterações
Em primeiro lugar, usei botões em vez de molas de pressão. Na parte de baixo correu tudo bem, mas na carcela tive alguns problemas — devo-me ter enganado a medir os botões de pé e as casas ficaram pequenas. Pequeno detalhe: só me apercebi disso depois de as ter aberto! Como é que dei a volta à situação? Descosi-as e fiz umas maiores. Achei que não perderia nada em tentar.. e não é que correu bem?

Outra pequena alteração que fiz foi engomar o macho nas costas de maneira a que ficasse aberto a meio (inverted box pleat), em vez de o ter tombado para o lado, como diziam as instruções. Ah, também cosi os lados com costuras inglesas (tenho mesmo de fazer um post sobre esta técnica de que gosto tanto) e não segui as instruções para debruar o colarinho, porque prefiro coser primeiro a fita de viés pelo avesso, para depois a pespontar pelo direito.

5. Notas finais
Este molde é impecável mas a minha execução não foi das melhores, sobretudo porque tive o Rodrigo sempre em cima de mim (ver fotografia abaixo).

Acho que o molde é facilmente personalizável e apetece-me experimentar uma série de versões diferentes. Fiz uns esboços rápidos das minhas ideias (não liguem à minha falta de jeito):   acrescentar uma gola redonda, um colarinho à Mao ou até uma gola franzida de bordado inglês; tentar manipular as pregas, de maneira a eliminá-las, ou transformá-las em pequenas pinças ou mesmo substituí-las por smocks; passar a abertura para trás;  fazê-lo numa malha às riscas estilo bretão. Será que vou ter tempo para tudo isto? 

I like to keep the blog relatively diversified but lately all I want to do is sew. Over the years I’ve realised that I enjoy sewing much more in summer than winter, and lately I’ve been feeling a great urgency in sewing clothes for Pedro. As I’ve said before, now I know how quickly this first year goes by and this is my chance to make him baby-ish things… next year he’ll be a little boy and boys clothes isn’t all that varied. How lucky are the mothers who sew for girls?… Today I’m going to tell you about this little romper suit I made for him.

1. Pattern
Lullaby Layette Bodysuit, again by Oliver + S (my favourite patterns, without a doubt). This pattern also includes a shirt, a jacket and a pair of trousers, but what prompted me to buy it was the bodysuit. I love babies dressed in one-piece garments: it’s so practical and no matter how much they wriggle, their clothes are always tucked in nicely. 

2. Sizing
Pedro is now 5 and a half months so I cut size 6-12 months… but unfortunately the bodysuit is already too small. Apparently, Pedro — just like Rodrigo and I — has a long torso. I’m going to try to alter the pattern by lengthening it slightly in the belly area.

3. Fabric
I used a fine but crisp cotton that I think I bought in Staffordshire, at a fabric shop that used to sell lots of well-priced remnants.

4. Alterations
To start with, I used buttons instead of snaps. In the nappy area everything went fine but I encountered a major problem in the placket — I must have measured the shank buttons incorrectly and the buttonholes turned out much too small. Minor detail: I only realised they were too small after I opened them! So what did I do? I unstitched them and then I stitched longer ones. I figured I had nothing to loose and it actually worked!

The other small alteration I made was to press the pleat in the back as an inverted box pleat, instead of pressing it to one side as the instructions said. Oh and I used French seams for the sides and I didn’t really follow the steps for binding the collar because I like to sew the bias tape on the wrong side first and then topstitch it on the right side.

5. Final notes
This is an impeccable pattern but my execution wasn’t exactly top notch, mainly because I had Rodrigo on my lap (and on the table) most of the time (see above picture).

This is a very customisable pattern and I’m urging to try it in lots of different versions. I made a quick sketch of my ideas (please disregard my poor illustration skills): adding a collar (Peter Pan, Mao or just a ruffled broderie anglaise edging); trying to manipulate the pleats in order to either eliminate them or replace them with small pin tucks or smocking; making the placket in the back; sewing it in breton-style knit. Will I have enough time to try all this?

(photos: © Constança Cabral)

Refashion Week :: From Shirts to Shorts

A Magda desafiou-me para participar na Refashion Week, juntamente com uma série de outras bloggers, todas elas portuguesas! Qual foi a primeira coisa em que pensei? Aproveitar camisas, claro! 
Com a chegada do Verão, o Rodrigo estava a precisar de pijamas frescos. À semelhança daquilo que fiz há dois anos, aproveitei camisas do meu pai e do Tiago para fazer-lhe quatro pares de calções, mas desta vez usei um molde diferente: os Sunny Day Shorts do Oliver + S. 
O molde é gratuito mas não deixa de ser impecável (os moldes Oliver + S são irrepreensíveis). As únicas alterações que fiz foram: 1- coser tudo com costuras inglesas e 2- arredondar um bocado a frente dos calções, porque o gancho era demasiado grande e fazia uma espécie de fole. Usei o tamanho 4 anos para o Rodrigo, que vai fazer 3 anos daqui a um mês (o primeiro par que fiz — e que não fotografei — foi com o tamanho 3 anos e achei que estavam bons agora, mas não serviriam daqui a seis meses… e quero que os calções voltem a ser usados durante o Verão português).
Dá gosto fazer costuras assim! Hoje em dia acho que ninguém cose para poupar dinheiro, mas este projecto é daqueles em que só se gasta linha, electricidade e tempo. E é tão bom vê-lo a usar calções confortáveis, frescos e com bom corte, e pensar que os fiz com materiais reciclados. 
Como sabem, farto-me de aproveitar camisas de homem — um dia tenho de fazer um post com um apanhado de tudo aquilo que já fiz — porque os tecidos são excelentes e, muito francamente, de graça! Para fazer cada um destes calções usei apenas as costas e uma manga de cada camisa. Com o que sobrou, ainda consegui fazer uns quantos babetes para o Pedro.
Obrigada, Magda, pelo convite para participar na tua série! Para verem mais reciclagens criativas de um grupo de bloggers talentosas, não deixem de visitar o blog ao longo desta semana. E espreitem aquilo que a Maria João fez hoje!
Magda invited me to take part in her Refashion Week, along with a handful of other Portuguese bloggers. What was the first thing that occurred to me when I read her email? Upcycling shirts, of course!

It’s been hot around here and Rodrigo was in need of some cool pyjamas. Just like I did two years ago, I turned a bunch of old men’s shirts into pj bottoms, but this time I used a different pattern: Oliver + S Sunny Day Shorts.

It’s a free pattern but that doesn’t mean that it’s any less perfect that the other Oliver + S patterns. The only alterations I made were: 1- I French-seamed (is that a verb?) everything; 2- the front was sitting too high and that was causing some odd folds, so I lowered it a bit by cutting a soft rounded line across the front (I eyeballed this). I sewed size 4 for Rodrigo, who’s turning 3 next month. I started by sewing size 3 (not pictured here) but even though they were fine for now, I know that in 6 months time they’ll no longer fit (and he’ll need them for the Portuguese summer).

I find this type of sewing incredibly satisfying. I guess nowadays no-one sews in order to save money but this is one of those projects where you only consume thread, electricity and your time. And it feels great to see your children wearing comfortable, crisp and well-cut clothes that have been made using up recycled materials.

As you know, I’m always upcycling men’s shirts — I must to post a round-up of everything I’ve made so far — because they’re a source of great quality fabrics and, let’s be honest, it’s free fabric! To make each of these shorts I only used the back of the shirt and one sleeve. With the leftovers I made bibs for Pedro!

Thanks, Magda, for inviting me to play along with you. If you’d like to see what the other talented bloggers have created, don’t miss Magda’s blog updates this week. And check out what Maria João has come up with today!
(photos: © Constança Cabral)

Por Aqui :: Around Here


Por aqui é Verão. Nuns dias está sol, noutros chove, mas está quase sempre quente e húmido. O Rodrigo esteve de férias e fartou-se de brincar, ver livros, ouvir música, cozinhar, cantar e rir. O Pedro continua a crescer bem, sempre com bom feitio. O nosso jardim está ao rubro e temos comido aquilo que não interessa aos pássaros e aos caracóis (ultimamente framboesas, alfaces e ervas aromáticas).
Gosto muito de ir fotografando alguns momentos do nosso dia-a-dia para depois compor estes posts (que depois suplemento com fotografias do Tiago) mas acho que, de vez em quando, tenho de fazer lembrar que estas imagens só mostram parte da realidade. Não vos mostro a desarrumação crónica, as camas por fazer, as birras do Rodrigo, o nosso cansaço, a confusão instalada na minha cabeça. Aquele almoço com o Rodrigo no jardim, por exemplo, foi sol de pouca dura: ele estava a portar-se tão mal que, passados dois minutos, viemos para dentro de casa. Isso não significa que a fotografia seja falsa — aquele momento aconteceu, sim, mas não durou muito tempo.
Porque é que estou a escrever algo tão óbvio? É que, por vezes, há quem não perceba que o meu blog é uma colecção de momentos felizes, que quero guardar para sempre na minha memória e que gosto de partilhar com as pessoas que me acompanham. É uma partilha virtual, é certo, mas não deixa de ser importante para mim. Se vivêssemos em Lisboa, será que mostraria tantas fotografias dos nossos filhos? Acho que não. Mas moramos longíssimo e custa-me não poder partilhar com outras pessoas a infância dos meus filhos.
Também me perguntam como conseguimos fazer tanta coisa com duas crianças pequenas e quase sem ajuda. A resposta é simples: demoramos imenso tempo a fazer o que quer que seja. O corredor de nossa casa foi pintado em quatro fases, que se prolongaram durante ano e meio, e eu ando há cinco meses para escrever um post sobre o assunto. Se eu gostava de voltar a escrever quatro ou cinco vezes por semana no blog? Claro que sim, mas nesta altura é-me impossível porque simplesmente não tenho tempo.
Tenho muitos planos para 2015, sendo que o mais importante — depois do bem-estar da minha família, claro — é contribuir mais para o orçamento familiar. Tenho algumas ideias que espero conseguir pôr em prática, mas adoraria ouvir as vossas sugestões. Que produtos gostariam que eu lançasse? Se tiverem um bocadinho livre, escrevam as vossas sugestões nos comentários ou, melhor ainda, enviem-mas por email. Muito obrigada!
It’s summer around here. Some days it rains, other times the sun shines, but it’s almost always hot and humid. Rodrigo’s school was closed for a few weeks and he enjoyed himself at home: he played, read books, listened to music, cooked, sang and laughed a lot. Pedro keeps on growing and he’s such a happy chap, always in a good mood. Our garden is thriving and we’ve been eating the things birds and snails don’t seem to enjoy too much (lately it’s been raspberries, lettuces and herbs).
 
In order to compose these “around here” posts, I like taking pictures of certain moments in our everyday life and then I supplement them with photos taken by Tiago. However, I feel that, from time to time, I must  remind you that these images are just a part of our reality. I don’t show you the constant state of untidiness, the unmade beds, Rodrigo’s tantrums, our tiredness or the mess that lives inside my head. For instance, that lunch in the garden with Rodrigo only lasted for two minutes: he was behaving so badly that we quickly came back inside. That doesn’t mean that the image is a lie — that moment did happen but it was extremely short-lived.
 
Why am I stating the obvious? Well, sometimes people don’t seem to understand that my blog is a collection of happy moments, moments I want to keep in my memory and moments that I enjoy sharing with others. It’s a virtual kind of sharing, for sure, but it’s sharing nonetheless. Would I post so many pictures of my children if we lived in Lisbon? I don’t think so. But we live incredibly far away from home and I find it hard not being able to share the boys’ childhood with anyone.
 
I’m also asked often how we manage to do so much with two kids and very little help. The answer is simple: it takes us an awfully long time to make anything. Our corridor was painted in four stages over a year and a half and I’ve been wanting to blog about it for five months now. Would I like to go back to blogging four or five times a week? I would, actually, but right know that’s impossible because I simply don’t have the time.
 
I’ve got lots of things planned for 2015 and the most important one — besides taking care of my family — is to contribute more to the family’s finances. I’ve got a few ideas that I’d love to execute but I’d really like to hear your thoughts on this. What would you like me to offer? If you have a minute, write up some suggestions in the comment section below or, even better, shoot me an email. Thank you very much!
(photos: © Constança Cabral)


Mulberry Tunic :: An Upcycled Men’s Shirt

(do avesso :: inside out)

Estou contentíssima com esta camisa de Verão que fiz para o Rodrigo. Ficou fresca, confortável e, simultaneamente, arranjadinha q.b. Ele também gostou!
1. O molde
Mulberry Tunic da Olga do blog Kid Approved. Este molde tem algumas variações: mangas curtas ou compridas, bolsos e um capuz. É um molde digital (quando o compramos, recebemos um ficheiro PDF por email) e vai dos 18 meses aos 12 anos.

2. A minha versão
Fiz a versão que gastava menos tecido (já vos vou dizer porquê): mangas curtas, sem bolsos nem capuz. Fiz as presilhas das mangas mais curtas (diminuí-lhes 2,5 cm no comprimento) e fiquei rendida às dobras das mangas, que são feitas de uma maneira muito engenhosa. O remate do colarinho não foi cortado em viés — mas sim num ângulo esquisito entre 45º e 90º, porque não havia tecido suficiente —, daí ter ficado um bocadinho ondulado (mas isto é um preciosismo… quase nem se nota, sobretudo porque o Rodrigo nunca está quieto!). Cosi os lados com costuras inglesas, o meu acabamento preferido.

3. O tamanho
Fiz o tamanho 3 anos para o Rodrigo, que vai fazer 3 anos daqui a um mês. Fica-lhe impecável, mesmo à medida.

4. O tecido
Reutilizei uma camisa fil-à-fil do meu pai, daí o tecido ter sido tão à conta! Era uma camisa clássica para usar com gravata, mas o colarinho já estava muito esgarçado e acho que já tinha sido virado uma vez. Como sabem, farto-me de aproveitar camisas de homem para tudo e mais alguma coisa, e o tecido desta era tão bom que tinha mesmo de ser utilizado para algo especial. Estas são as minhas reciclagens preferidas: aquelas em que se consegue tirar o máximo partido da peça original, mas o resultado não fica com ar de reaproveitamento. Os botões madrepérola vieram de outra camisa.

5. Notas finais
Devo confessar que hesitei um bocado antes de comprar este molde, porque aquela costura a meio ali à frente não me convencia… Percebo a razão porque ela existe: é uma maneira fácil de fazer uma carcela até meio, para dar à camisa um ar de túnica — e eu, como costureira autodidata e com pouco traquejo nesta arte da confecção, agradeço a intenção. Mas, como o molde ficou em saldos antes do Natal, resolvi arriscar. Ainda bem que o fiz! Gosto imenso do resultado, acho que a costura nem se nota e fartei-me de aprender com as instruções. Agora quero fazer uma versão de Outono com mangas curtas e capuz.
I’m really happy with this summer shirt I made for Rodrigo. It turned out great: cool, comfortable and not too dressy but not too casual either. He approves!

1. The pattern
Mulberry Tunic by Olga from the blog Kid Approved. This pattern offers a few variations: short or long sleeves, pockets and a hood. It’s a digital pattern (which means that you get a PDF file on your email inbox) and it’s sized from 18 months to 12 years.

2. My version
I made the version that used up less fabric (more on that later): short sleeves, no pockets and no hood. I made the sleeve tabs 1” shorter than the original ones and I was really pleased with the fold on the sleeves, it’s really clever. I didn’t manage to cut the tape for the collar on the bias because I didn’t have enough fabric — I was forced to cut it in a funny angle somewhere between 45º and 90º, and that’s why it doesn’t lay completely flat (but since Rodrigo never sits still, you’ll never notice it). I used French seams for the sides of the shirt.

3. The size
I made a size 3 for Rodrigo, who’s turning 3 next month. The fit is perfect.

4. The fabric
I upcycled a fil-a-fil shirt that used to belong to my father. It was one of those classic shirts to wear with a tie but the collar was getting old and I think it had already been turned once. As you know, I love breathing new life into old clothes and this shirt’s fabric was really high quality, so I had to use it to make something special. This is my favourite kind of recycling: where you’re able to make the most of the original piece but the result doesn’t look like “making do”. The shell buttons came from another shirt.

5. Final notes
I confess that I hesitated a bit before buying this pattern because of that front horizontal seam. I guess I know why it’s there: it makes the whole job of sewing the half placket a lot easier — and I, as a self-taught sewer and a beginner in the art of dressmaking, undoubtedly appreciate the intention. But when the pattern went on sale before Christmas, I decided to give it a go. Well, I’m glad I did! I love how the tunic turned out, the aforementioned seam doesn’t bother me at all and I learned a lot from Olga’s instructions. Now I want to make an autumn version with long sleeves and a hood.

(photos: © Constança Cabral)