Pudim Flan :: Portuguese Caramel Flan

[scroll down for English]

Pudim flan é uma daquelas sobremesas que imediatamente me fazem recordar a infância. Digamos que, em conjunto com o bolo de natas, a mousse de chocolate com bocadinhos de amêndoa por cima (numa taça específica) e a torta de laranja, funciona como uma espécie de madalena de Proust para mim. Uma garfada e sinto-me de volta aos intermináveis dias de Verão na companhia da minha querida avó.

Há uns anos a minha mãe passou-me a receita do pudim que ela faz: uma versão mais simplificada do pudim da minha avó, mas igualmente saborosa. Ontem finalmente experimentei a receita e fiquei espantada com duas coisas: 1- é incrivelmente fácil, rápido e infalível; 2- é capaz de ainda ser melhor do que o pudim da minha infância!

Algumas notas:

  • Este pudim é cozido na panela de pressão. Imagino que também possa ser cozido no forno ou até em banho-maria ao lume mas, nesses casos, o tempo de cozedura será mais prolongado.
  • Uso uma forma de pudim tradicional portuguesa com tampa. A minha forma tem 1,5 l de capacidade e é ideal para 6-8 ovos. Pode usar-se uma forma maior ou mais pequena (e adaptar o número de ovos em conformidade) ou até aquelas forminhas individuais para pudins (a minha avó às vezes fazia-nos pudins assim quando éramos pequenos).
  • Esta receita é parecida com a receita de pão-de-ló, no sentido em que funciona com base em proporções (o mesmo peso dos ovos em açúcar, etc). Estas receitas são as minhas preferidas porque são absolutamente infalíveis e podem ser adaptadas sem quaisquer dificuldades. Não interessa se os ovos são grandes ou pequenos, o que importa é o peso total. Eu uso ovos caseiros (compro-os a uma amiga) e são todos de tamanhos diferentes!
  • O pudim deve ser feito de véspera (ou com bastantes horas de antecedência), para que possa ser servido bem fresco.
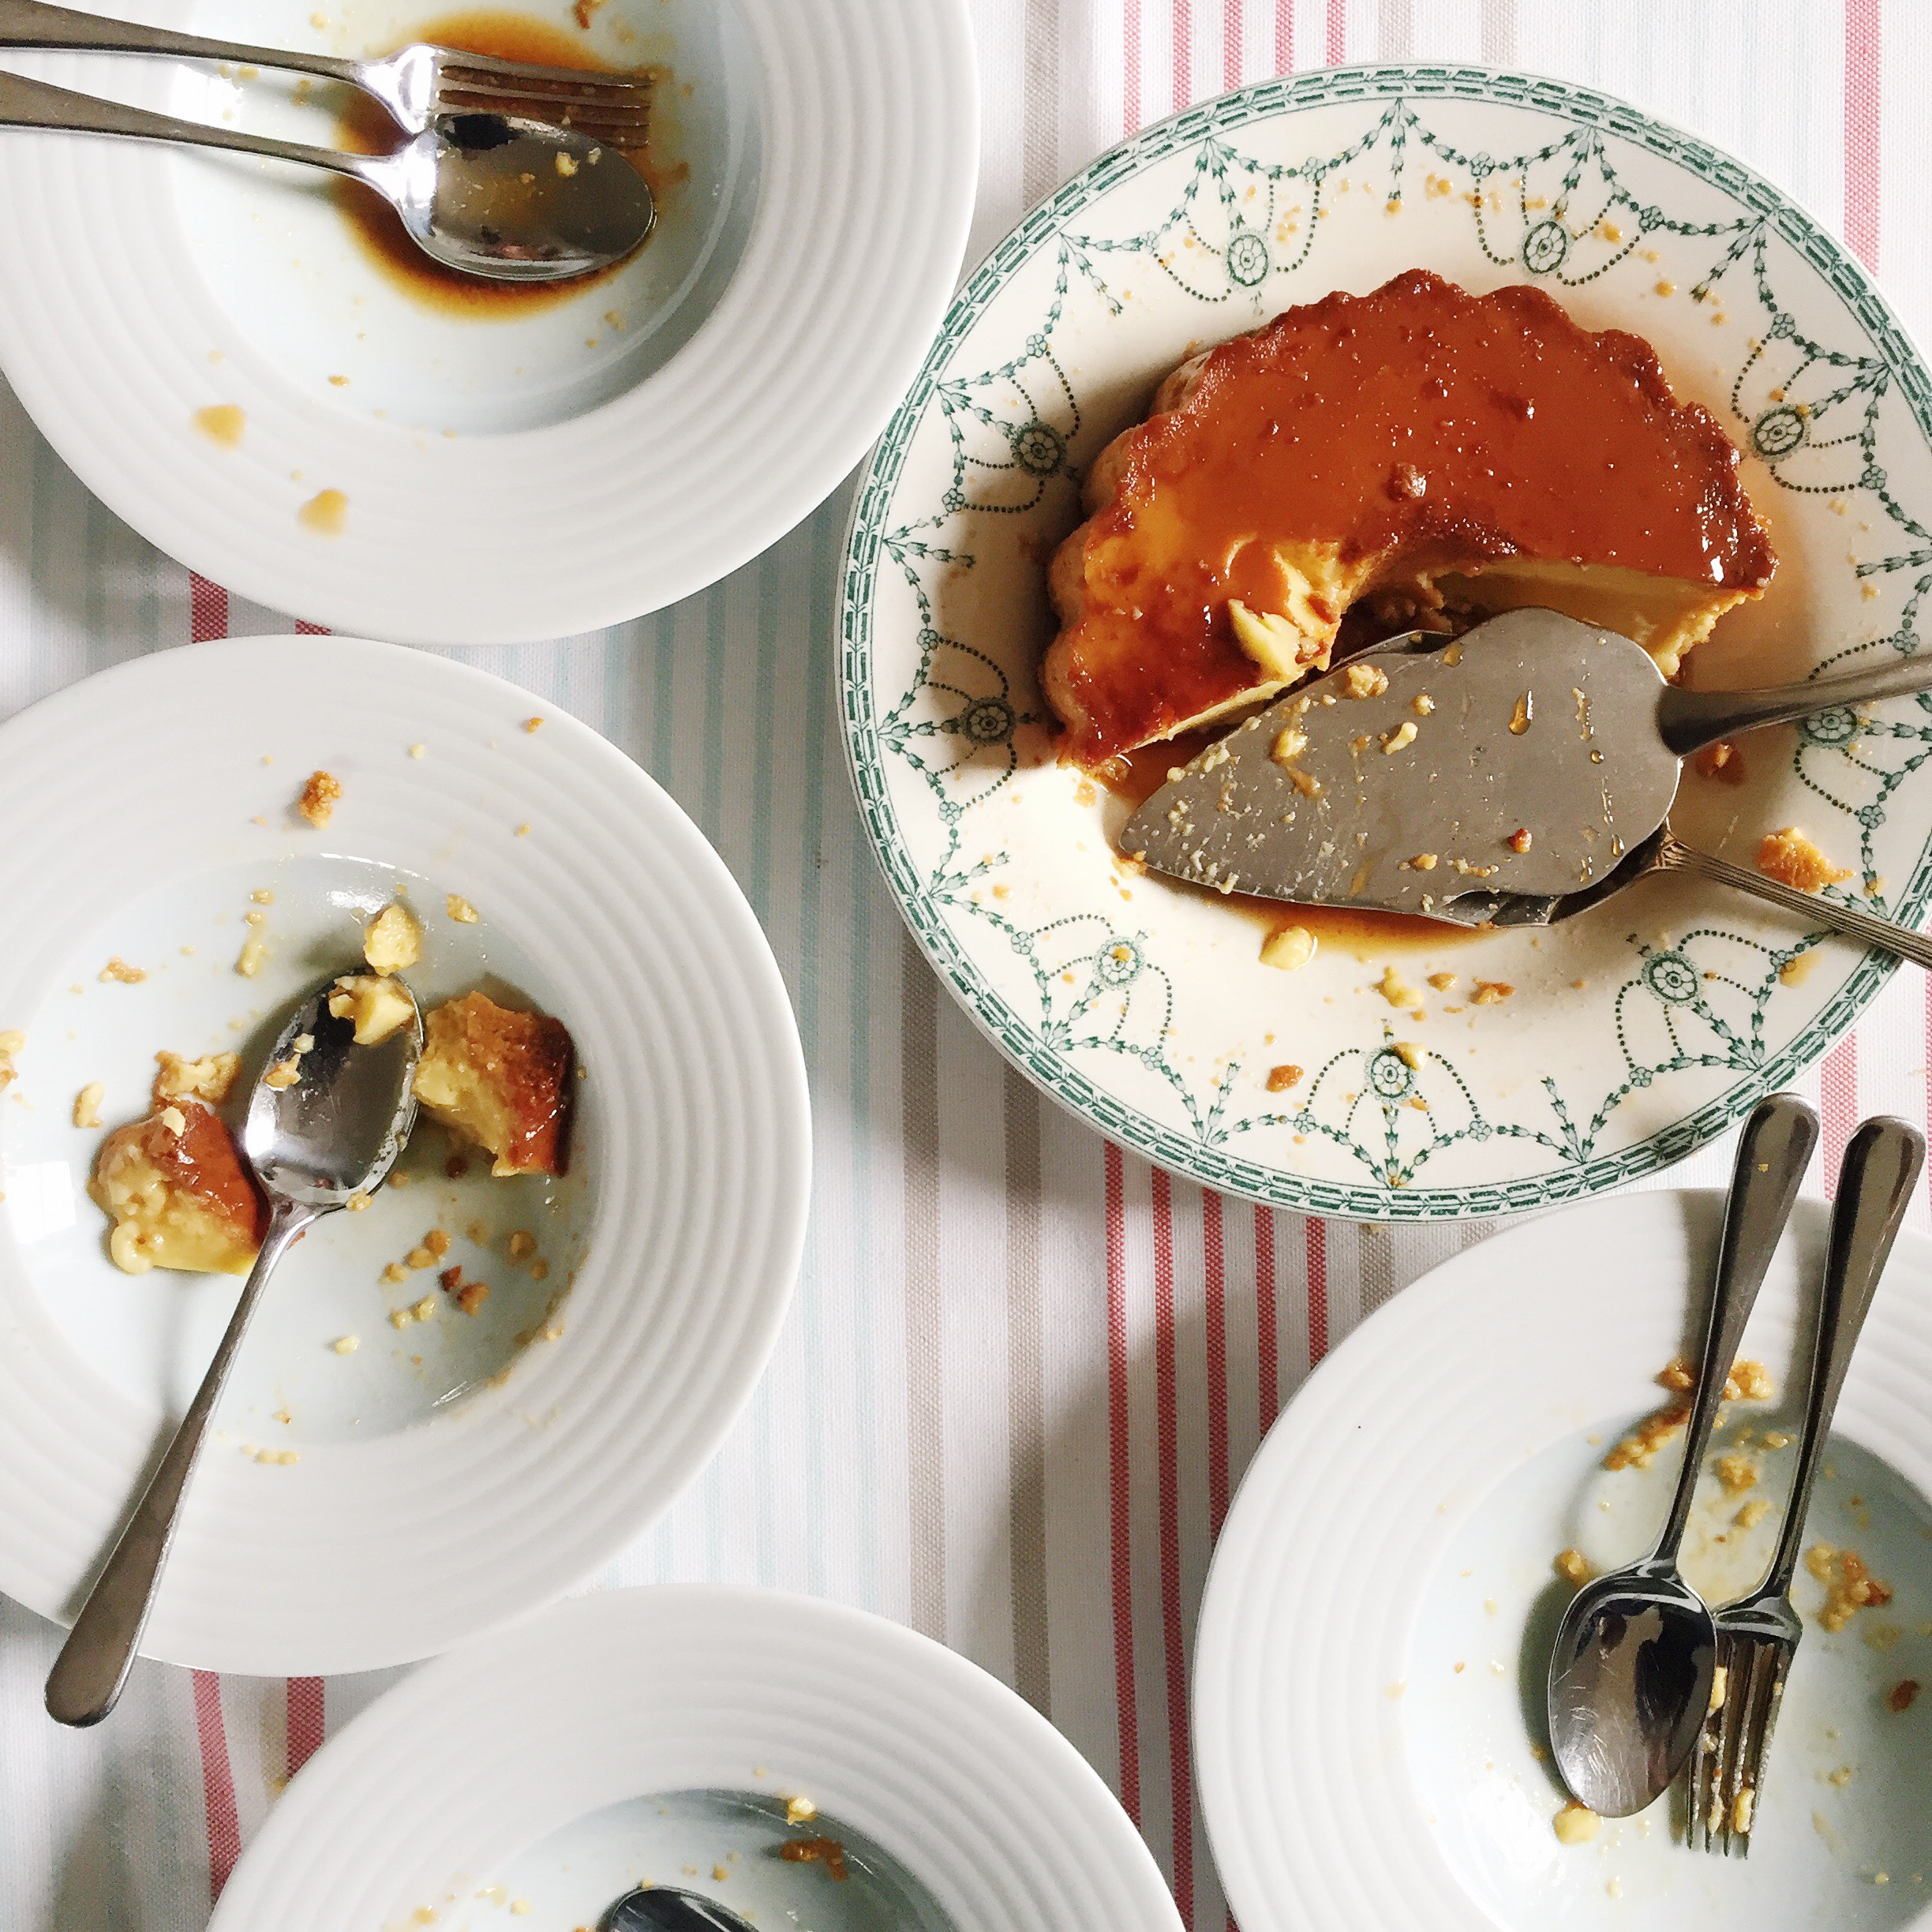
  • Convém usar um prato fundo para desenformar o pudim. A calda é melhor parte e precisa de espaço! Por coincidência, na semana passada encontrei, numa loja de caridade, um prato inglês igual ao serviço de jantar dos meus trisavós (os avós da minha avó). Claro que tive de usá-lo para servir este pudim… foi uma espécie de homenagem inesperada!


Vamos então à receita:

Pudim Flan

para o caramelo:

aproximadamente meia chávena de açúcar (o suficiente para cobrir generosamente o fundo da forma)

um pouco de água

para o pudim:

1 medida de ovos (eu pesei 6 ovos inteiros, ainda com casca)

1 medida de açúcar (o mesmo peso dos ovos)

1,5 medidas de leite gordo (1,5 x o peso dos ovos)

raspa de 1 laranja / raspa de 1 limão / 1 vagem de baunilha (eu usei raspa de laranja)


Começar por fazer o caramelo: deitar o açúcar e umas gotas de água para o fundo da forma de pudim e pô-la ao lume. O açúcar vai derreter e depois vai começar a caramelizar. É importante retirar a forma do lume um pouco antes de o caramelo estar no ponto (antes de atingir a cor de caramelo), porque a forma continua quente e o açúcar vai continuar a caramelizar, mesmo depois de retirado do fogão. Espalhar o caramelo pelos lados da forma.

Numa taça, bater os ovos com o açúcar. Não é preciso bater muito tempo, basta que fiquem bem misturados.

Adicionar o leite e a raspa de laranja / raspa de limão /sementes da vagem de baunilha e bater.

Deitar o preparado na forma de pudim e tapá-la (se a forma não tiver tampa, pode usar-se um bocado de papel de prata).

Colocar a forma de pudim dentro da panela de pressão e adicionar água até cerca de 2/3 da altura da forma. Tapar a panela, pô-la ao lume e deixar cozer o pudim durante 10 minutos, a contar a partir do momento em que a panela levanta pressão. Abrir a panela depois de despressurizada e retirar a forma.

Deixar arrefecer o pudim na forma. Para desenformar, passar primeiro com a ponta de uma faca a toda a volta, na parte de cima da forma, para descolar o pudim. Pôr um prato fundo por cima da forma e virá-los ao contrário, e colocar no frigorífico ainda com a forma em cima do pudim, para que o caramelo vá escorrendo. Retirar a forma mesmo antes de servir o pudim.

A caramel flan is one of those desserts that reminds me of my childhood. I’d say that, along with sponge cream cake, chocolate mousse with chopped almonds on top (served in a very specific bowl) and orange roulade, it’s a kind of Proust’s madeleine for me. One bite and I’m immediately transported to long summer days in the company of my darling grandmother.

Some years ago, my mother gave me the recipe of the flan she makes: it’s a simplified version of my granny’s one but equally delicious. Yesterday I finally gave it a try and I must say I was amazed by a couple of things: 1- it’s incredibly easy, quick and foolproof; 2-I’d go so far as to say that it tastes better than the ones from my childhood!

A few notes before I share the recipe with you: 

  • You cook this in the pressure cooker. I imagine you could also bake it in the oven or in a bain-marie on the stovetop, but the cooking time would be much longer in those cases.
  • I use a traditional Portuguese flan tin with a lid. My tin has 1,5 l of capacity and is ideal for 6-8 eggs. You could of course use a smaller or larger tin (and adapt the number of eggs in conformity to the size of the tin) or even those cute little vintage flan tins (my granny would sometimes use those when we were little).
  • This recipe is similar to the recipe for pão-de-ló (Portuguese sponge cake in the way that it’s also based on proportions (the weight of the eggs determines the weight of the other ingredients). I love these recipes because they are both foolproof and highly adaptable. It doesn’t matter whether your eggs are big or small — what matters is their weight in total. I buy my eggs from a friend and, unlike supermarket eggs, they come in all sorts of different sizes, so this recipe works a treat. 
  • You should probably make this flan the day before you eat it because it must be served chilled. Or make it in the morning and serve it at dinner time.
  • It’s best to use a deep dish to serve up the flan. The caramel is the best part and it needs lots of room! By coincidence, in a charity shop last week I found an English plate that matches my great-great-grandparents dinner set (my granny’s grandparents). Of course I had to use it with this flan… by doing so ended up paying an impromptu homage to my grandmother.


All right, let’s get to the recipe:

Portuguese Caramel Flan

for the caramel:

roughly half a cup of sugar (enough to generously cover the bottom of your tin)

a little bit of water

for the flan:

1 measure of eggs (I weighed 6 eggs still in their shells)

1 measure of sugar (the same weight as the eggs)

1,5 measures of whole milk (1,5 x the weight of the eggs)

the zest of 1 orange / the zest of 1 lemon / the seeds from 1 vanilla pod (I used orange zest)


Start by making the caramel: pour the sugar and a few drops of water into the flan tin and place it directly on the stovetop (the tin I use is actually made of tin… if yours is of a different material, just make the caramel in a pan and then pour it into your flan tin). The sugar will melt and then start to caramelize. You should take the tin out of the heat a little before the caramel is done (before it actually looks like brown caramel) because the tin will still be hot and the sugar will keep on cooking for a bit. Coat the sides of the tin with caramel.

In a bowl, beat the eggs and the sugar. You don’t have to beat them for too long… just enough to fully incorporate everything. 

Add the milk and the orange zest /lemon zest /vanilla seeds and whisk. 

Pour the mixture into the flan tin and put the lid on (or cover it with a piece of kitchen foil). 

Place the tin inside your pressure cooker and add water until you reach 2/3 of the height of the tin. Close the pressure cooker lid, place it on the stovetop and let it cook for 10 minutes at high pressure (only start counting after you’ve hear the loud pressure noise). Open the lid after the cooker has depressurized and take the tin out.

Remove the lid from the tin. Once the flan has cooled down, use the point of a knife to gently unstick it from the tin. Place a deep plate over the tin and turn them upside down. Don’t take the tin out just yet — put the plate in the fridge and let the caramel slowly coat the whole flan. Only take the tin out when you’re ready to serve the flan. 

Bordados neozelandeses :: NZ vintage embroidered linens

No meu último vídeo (uma caixa de costura antiga) falei-vos no livro “Thrift to Fantasy”, da autora Rosemary McLeod, que versa sobre os lavores femininos neozelandeses das décadas de 1930-40-50. Pois bem, hoje mostro-vos uma colecção de panos neozelandeses dessa mesma altura, que tive a sorte de conseguir comprar numa loja de caridade recentemente.

Como sabem, sou absolutamente apaixonada por têxteis antigos e sei que não sou a única a perder a cabeça com este tipo de coisas. Espero que achem graça a este vídeo!

Dois desafios para vocês:

  • Partilhem, aqui na caixa de comentários, as maneiras como tratam dos vossos panos antigos: truques para tirar nódoas de ferrugem e manchas de humidade, como os guardam, se os põem a uso…
  • Mostrem-nos as vossas colecções! Se tiverem conta no Instagram, usem o hashtag #myvintagelinens. Mal posso esperar para ver o que está guardado nos vossos armários e cómodas! Se preferirem, enviem-me um email com algumas fotografias (ou convidem-me para vê-los ao vivo na próxima vez que eu estiver em Portugal!).

I’ve been filming videos in Portuguese and I’m wondering whether non-Portuguese speakers would be interested in subtitles. Do let me know your thoughts on this matter.

This video is all about by my latest textile finds at a local op shop (charity shop/thrift store). I was lucky enough to be invited into the staff room and I spent a blissful half-hour rummaging through boxes full of old doilies, tray cloths and tablecloths and chatting with a handful of lovely ladies. It was exactly what my dreams are made of! 

Today I’ve got two challenges for you:

  • In the comment section below, tell us about how you care for your vintage linens. Any tricks for getting rid of old stains like rust and mildew? How do you store them? Do you actually use them?
  • Share your collection with us! If you’re on Instagram, tag your photos with the #myvintagelinens hashtag. Or, if you prefer, send me an email with some pictures (or invite me into your home so I can see them with my own eyes!).

A day in the life

[scroll down for English]

Tenho este post parado na pasta dos rascunhos há já umas semanas (acabei de reparar que já lhe fiz 25 revisões… ui!). Estas fotografias mostram um bom dia de Inverno passado, cá em casa, na companhia do Rodrigo. Mas não é, nem por sombras, um dia típico — normalmente ele está na escola e eu estou em casa a fazer aquilo que tem de ser feito para termos uma existência minimamente confortável, assim como algum trabalho criativo (que costumo priorizar em detrimento de uma casa arrumada ou de ler e responder a emails).

Nas versões anteriores que escrevi foram aparecendo alusões a assuntos mais pesados e sombrios. Ser mãe neste isolamento não tem sido fácil para mim — já aludi a isso uma ou outra vez — e já me aconteceu sentir-me algo defraudada em relação àquilo com que, de forma insconsciente, contava quando fiquei grávida pela primeira vez. Dou por mim a escrever sobre gestão de expectativas, depressão pós-parto, solidão… e depois acabo sempre por apagar tudo o que escrevi.

Talvez tenha a ver com a maneira como fui criada, ou com as minhas circunstâncias sociais e culturais, mas tenho uma enorme dificuldade em falar sobre estes assuntos num espaço tão público. É curioso, porque até me considero uma pessoa relativamente aberta — pelo menos até um certo ponto — e não teria tantos pruridos em discutir estes assuntos numa conversa de viva voz. É capaz de ser este formato de blog que complica as coisas — o facto de vocês só verem as palavras que escolho pôr por escrito, sem que sejam acompanhadas de expressões faciais ou linguagem corporal. Eu escrevo um post, vocês deixam um comentário (ou não)… mas não há aquele diálogo natural entre pessoas que se encontram face a face.

Onde é que eu quero chegar com isto? Bem… continuo a não conseguir saber lidar muito bem com aqueles posts em que conto apenas uma parte da história. Ao mostrar imagens fora de contexto, arrisco-me a ser superficial e não totalmente verdadeira. Sim, é óptimo focarmo-nos nas partes positivas das nossas vidas (e eu tenho a sorte de estar rodeada de amor e saúde), mas o facto de simplesmente apagar as partes difíceis não me parece que seja especialmente útil a quem leia este blog e esteja a passar por uma situação semelhante à minha.

Enfim, acho que vou ficar por aqui. Gosto de ter voltado ao blog, mas continuo um bocado à deriva em relação a conseguir encontrar o meu equilíbrio: aquele ponto ideal entre um blog que não é confessional, mas que também não é apenas um “show and tell”. Obrigada por me continuarem a acompanhar nesta viagem de descoberta e partilha.

I’ve had this post sitting on my drafts folder for a few weeks now (I’ve just counted 25 revisions… yikes!). This is what a good winter’s day with Rodrigo looks like when he’s at home with me. It’s the ideal day, so to speak. It’s not our everyday, thought — he’s usually at preschool and I’m at home doing housework and sometimes a bit of creative work too (which I always tend to prioritise in detriment of a tidy home and an inbox under control).

In previous versions of this post, deeper, darker subjects have crept up. I don’t find motherhood in isolation easy (I’ve hinted at it a couple of times in the past few years). Sometimes I feel that this isn’t what I signed up for — the isolation bit, not motherhood itself — and I write about managing expectations, coping with postnatal depression, isolation…. and then I delete it all.

It might have to do with my particular upbringing and my social and cultural circumstances, this whole difficulty in discussing certain matters in such a public space. It’s funny because I’m quite an open person — up to a point, I guess — and I’d have no problems discussing these issues with most of you in a conversation in real life. Perhaps it’s just this blogging format that doesn’t feel very conducive to this kind of conversation — the fact that you can only see my written words, without my facial expressions and body language going along with them. Or maybe it’s just the way blogging works:  I publish a post, you might leave a comment, but there’s no easy way of getting that natural back and forth that you get when you’re talking face to face with another person.

So  where am I getting at? I guess it’s just the fact that I struggle with telling you only one part of the story. Showing images and not providing a context can sometimes feel superficial and untrue. Yes, focussing on the positives is great (and I am so lucky to be surrounded with love and good health) but simply wiping out the difficult parts might not be particularly helpful to someone who might be reading this blog and going through a situation similar to my own.

Well, I guess that’s it for today. I’m glad I’ve resumed blogging but I’m still struggling to find my balance: that ideal place between a blog that’s not confessional but which also isn’t just a show and tell. Thank you for coming along with me in this journey of self-discovery and sharing.


Uma caixa de costura antiga :: An old sewing box

Numa das minhas frequentes incursões por armazéns de velharias encontrei uma caixa de costura antiga. À primeira vista não parecia nada promissora, mas felizmente observei-a com mais atenção e deparei-me com uma série de objectos muito curiosos. Fiz um pequeno vídeo para vos mostrar o que lá descobri — espero que achem graça!

As you know, I’m a keen second-hand shopper. In one of my recent trips I found an old sewing box — in fact, it was no more than a plastic cutlery tray wrapped in dusty plastic. However, upon further inspection I realised that it held several interesting sewing objects and decided to bring it home with me. I filmed a short video (in Portuguese only, sorry!) unveiling my findings.

A caixa incluía os suspeitos do costume: agulhas e alfinetes, molas e colchetes, todos eles com embalagens bastante cativantes. Também lá encontrei coisas que se tornaram obsoletas com o correr dos tempos: fios de seda para passajar meias de senhora, por exemplo. Mas aquilo que me fez comprar a caixa de costura foi a profusão de rendas, fitas e aplicações, tão difíceis de encontrar aqui na Nova Zelândia.

The sewing box included the usual suspects, like needles, pins, snaps, hooks and eyes… all of them in appealing vintage packaging. I also found things that are no longer used, like silk thread to mend ladies’ stockings. But what made me buy the lot was the trimmings: bits of cotton lace, guipure and velvet trims, all quite hard to find here in New Zealand.

No vídeo pergunto-me para que serviriam aquelas duas caixas circulares com agulheiros — pois bem, o Tiago descobriu imediatamente o seu intuito. Os agulheiros encaixam o interior das tampas e as caixas transformam-se em cogumelos para remendar meias!

Halfway through the video I wonder what those two plastic boxes were for — well, Tiago played with them and found out that they can be turned into darning mushrooms!

A boneca Amélia teve direito a participação especial, assim como o livro Thrift to Fantasy, da autora Rosemary McLeod.

Amelia the doll made a special appearance in the video, as well as the bookThrift to Fantasy by Rosemary McLeod.

Por aqui :: Around here


[scroll down for English]

Por aqui estamos em pleno Inverno. Muito frio, muita chuva mas também muitos dias de sol (felizmente!). Tenho cosido bastante: uma boneca nova, máscaras, calças de pijama e camisolas para rapazinhos que estão sempre a crescer e até umas luvas feitas com feltro caseiro. Tenho variado as receitas de pão, tenho apreciado novamente os tricots feitos pelas avós (como eu gosto de coisas tricotadas à mão!) e tenho tido alguma sorte nas minhas incursões por mercados de velharias e lojas de caridade.

Continuamos a frequentar a biblioteca semanalmente (um dos pontos altos nas vidas dos meus filhos!) e tenho lido bastante. Neste momento estou a ler um livro que me está a marcar especialmente: Big Magic da Elizabeth Gilbert. É um daqueles títulos que está a ter um grande hype mas garanto-vos que vale mesmo a pena ser lido. Aliás, nunca li o famosíssimo Eat, Pray, Love e até estou a ficar com vontade de lhe dar uma oportunidade. Este Big Magic é encantador, muito positivo mas sem filosofias baratas. É sobre criatividade, percepções e medo. Peguei no livro porque gostei imenso do podcast que o acompanha: Magic Lessons. Já o ouviram?

E por falar em podcasts, descobri recentemente dois de que estou a gostar muito. O primeiro chama-se First Day Back e é sobre uma mãe cineasta que, após seis anos de licença de maternidade, resolve voltar a trabalhar. Esta temática interessa-me bastante e dá pano para mangas… muito sinceramente, acho que não há respostas certas nem erradas neste campo e que cada pessoa deve tentar fazer as suas escolhas de forma consciente. Mas também acho que as mulheres do século XX romperam com um paradigma milenar e não é em apenas duas gerações que a sociedade se consegue reajustar de forma equilibrada. Ou seja, ainda é muito difícil conciliar filhos e carreira. Vale a pena ouvir o podcast todo de seguida!

Outro podcast que descobri na semana passada foi o Slow Your Home. Uma das coisas boas que esta nossa vida na Nova Zelândia nos tem trazido é a calma no dia-a-dia. Nunca fui fã desta cultura actual de “busyness” (muitos programas, muitas compras, muito barulho, muito trabalho, muitos compromissos) e aqui parece que não tenho de me justificar quando faço escolhas menos frenéticas. Enfim, este é um tema que cada vez me interessa mais e vou continuar a ouvir, ler e pensar sobre o assunto.

Para vocês que estão a entrar no Verão, espreitem o Cose+, porque ao longo da próxima semana vamos ter imensas sugestões de costuras para dia quentes. Também tenho um separador aqui no blog dedicado exclusivamente ao Verão. E, se quiserem reciclar roupa para as vossas crianças, espreitem este post (calças de linho do avô transformadas em calções para o neto) e este post (fatos de banho do tio transformados em calções de praia para o sobrinho).


Around here we are in winter mode. Very cold, lots of rain but also plenty of sunny days (thank goodness!). I’ve been sewing a lot: a new doll, costumes, pyjamas and tops for two ever growing boys and even a pair of mittens out of homemade felt. I’ve been trying out new bread recipes, I’ve been appreciating again all the hand-knitted things made by both grannies (oh how I love hand-knits!) and I’ve been having some luck in my excursions to second hand markets and charity shops.

Every week we go to the library (it’s one of the highlights of my children’s lives!) and I’ve been reading a lot. Currently I’m enjoying Elizabeth Gilbert’s Big Magic. It’s one of those books that’s been hyped up a lot lately but I assure you it’s well worth a try. I’ve never read the uber famous Eat, Pray, Love and this book is actually making me want to give it a chance. Big Magic is charming, positive and devoid of cheap philosophy. It’s about creativity, perceptions and fear. I picked it up because I loved its accompanying podcast: Magic Lessons. Have you listened to it?

Speaking of podcasts, recently I’ve discovered two that I’m really enjoying. One is First Day Back, about a filmmaker who wants to get back to work after six years of maternity leave. This subject interests me and we could spend hours discussing it… honestly, I don’t think there are right or wrong answers – each person must try to make their own choices. But I also think that women in the 20th Ventura have broken a millennial paradigm and society can’t readjust itself in just two generations. In a nutshell, it’s still pretty hard to balance both children and career. This podcast is great for binge listening!

Another podcast I discovered last week is Slow Your Home. One of the good things this life of ours in New Zealand has afforded us is peace and quiet in our everyday. I’ve never been a fan of “busyness” (lots of engagements, lots of shopping, lots of noise, lots of work, lots of compromises) and here I feel that I don’t have to justify myself when I make less frantic choices. This is a theme that I find fascinating and I’ll go on listening, reading and thinking about it.

For those of you who are entering summer, make the most of it! If you want to dive into my archives, I’ve got a whole category dedicated to summer living and crafting right here.

Sophia the cloth doll, or the importance of play in one’s creative life

[scroll down for English]

Passei praticamente todas as minhas horas livres em Maio a fazer esta boneca. Comecei-a em 2012 (ao mesmo tempo do que esta, lembram-se dela?) e, já não sei bem porquê, de repente senti uma vontade enorme de acabá-la. A sua destinatária — que, na altura, tinha apenas 2 anos — já está na escola primária e, entretanto, ganhou duas irmãs. A perspectiva de fazer uma boneca com enxoval completo para três irmãs transformou-se rapidamente numa obsessão. Requisitei livros na biblioteca, peguei finalmente naqueles livros antigos que ando a coleccionar há anos, adormeci a pensar em bonecas, acordei a pensar em bonecas, recordei as bonecas da minha infância, as suas roupas e a maneira como eu brincava com elas. Curiosamente, as bonecas que mais me marcaram foram as de casa da minha avó: lembro-me de uma ruiva sardenta que tinha um impermeável amarelo com um chapéu a condizer e um fato de bailarina, e dos sapatos brancos de outra.

Bem, voltando a esta boneca de pano: é uma Poppy Doll. Quanto ao guarda-roupa, bem, esse foi feito sem moldes (excepto a camisa de noite). Aliás, usei moldes, sim, mas desenhei-os eu. E aqui entra a segunda parte do título deste post: a importância de “brincar” durante o processo criativo (escrevo brincar entre aspas porque não adoro a palavra neste contexto… mas enfim, acho que me conseguem perceber).

Deixem-me começar por dizer que não sou contra moldes. Bem pelo contrário: um molde de qualidade é, normalmente, garantia de sucesso, bem como um excelente ponto de partida para outros voos. Tenho comprado inúmeros moldes de costura ao longo dos anos e gosto de saber que, ao fazê-lo, estou a apoiar o trabalho das suas autoras (que, muitas vezes, são mulheres em situações muito parecidas com a minha). Vou continuar a comprar moldes e a encorajar outras pessoas a fazer o mesmo. Mas, por vezes, sabe bem criar algo sem base de espécie alguma. Fazer desenhos, provas em pano cru, duas, três, quatro tentativas, até conseguir concretizar aquilo que imaginei.

Ao longo deste mês deitei muitos ensaios fora. Senti-me frustrada, cansada, mas nunca desencorajada. Continuei a tentar e lá fui conseguindo fazer aquilo que queria. E já adivinham o que vou escrever agora: aprendi imenso! E também me diverti imenso!

Tive também a oportunidade de praticar a minha actividade preferida: dar novos usos a materiais antigos. Toda a roupa desta boneca foi feita com tecidos em segunda-mão, muitos deles aproveitados de antigas peças de roupa. O vestido e a blusa branca eram camisas de noite que comprei em lojas de caridade. As botas de feltro já foram uma camisola de lã (podem ler mais sobre feltro feito em casa aqui). A capa de fazenda já foi uma saia. O saco-cama foi feito com um pano de tabuleiro bordado, um cobertor antigo, um bocado de chita a fazer de colchão e um resto de bordado inglês que me sobrou das minhas capas de édredon (a inspiração para o saco-cama veio desta ideia da Florence).

Muitas vezes caio na armadilha de pensar que, pelo facto de o meu tempo livre ser limitado, tenho sempre de ser produtiva, eficiente, prática. Mas estou tão contente por ter dedicado um mês inteiro a este projecto. Sinto que expandi os meus conhecimentos de costura e que valeu a pena todo o investimento de tempo, esforço e dedicação. Esta boneca trouxe-me luz em dias escuros e entusiasmo em momentos monótonos. Agora espero que faça as delícias de três pequenitas em Lisboa.


I spent all of my free time in May making this doll. I had started it back in 2012 (at the time, I cut two dolls and only finished one — remember her?) and last month I felt the sudden urge to finish it. She’s meant for a girl who was 2 years old then and is now in primary school, having gained two sisters along the way. The idea of making a doll and her wardrobe for three sisters quickly developed into an obsession for me. I borrowed books from the library, I finally read all those old books I’ve been buying over the years, I went to sleep and woke up thinking about dolls, I reminisced about own childhood dolls, their clothes and the way I used to play with them. Funnily enough, I thought mostly about the dolls that I used to play with at my grandmother’s: I remember a freckled, red-haired one that had a yellow raincoat and a matching hat, as well as a ballerina outfit, and a particular pair of white doll shoes also came to mind.

Anyway, back to this cloth doll I made: it’s a Poppy Doll. As for her clothes, with the exception of the nightie, they were made without patterns. I mean, I used patterns but I drew them myself. And now comes the second part of the title of this blog post: the importance of play in one’s creative process.

Let me start by saying that I’m not against sewing patterns. On the contrary: a good quality pattern is usually a recipe for success, as well as a wonderful starting point for other creations. I’ve bought numerous patterns over the years and I like knowing that, by doing so, I’m supporting the work of their authors (who are usually women in similar situations to my own). I’m going to keep buying them and encouraging others to do the same. But sometimes it feels good to create something without a base whatsoever. I sketched on paper, I sewed two, three, four toiles, until I managed to achieve what I had in mind.

Throughout this past month I often felt frustrated and tired, but never discouraged. I kept trying and I somehow got to where I wanted to be. And I’m sure you’re guessing what I’m about to write: I learned so much! And I had so much fun!

I also had the change to practise my favourite activity: giving new uses to old materials. This doll’s wardrobe was entirely made with second hand fabrics, most of them repurposed from old clothes. The dress and the white blouse were originally nightgowns I bought in charity shops. The felt boots used to be a wool jumper (more on homemade felt here). The cape was salvaged from a skirt. Her sleeping bag was made with a mid-century embroidered tray cloth, an old wool blanket, a piece of Portuguese chita that makes me think of ticking mattresses and a piece of border anglaise left over from my duvet covers (the inspiration for the sleeping bag came from Florence’s adorable bear sleeping bags).

I often fall in the trap of thinking that because I’m time poor, I must always be productive, efficient, practical. But let me tell you how happy I am to have dedicated a whole month to this project. I feel that I’ve expanded my sewing knowledge and that all the time, effort and dedication have been well worth it. This doll brought me light in dark days and excitement in dull moments. Now I hope it will delight three little girls in Lisbon.


Papel de Parede Reciclado :: Upcycled Wallpaper

IMG_4797

O nosso escritório tem dois armários embutidos numa das paredes. São armários com pouca profundidade e serviam como guarda-fatos (esta divisão era originalmente um quarto), cada um com dois pequenos varões que vão do fundo até à frente (sabem do que estou a falar? vêem-se muito nas casas antigas) e umas prateleiras de lado nada funcionais. Durante mais de um ano usei-os assim para arrumar os meus acessórios de costura — enfim, bem podem imaginar a confusão que ia lá dentro. Após muitos meses de queixumes, lá consegui convencer o Tiago a construir-me umas prateleiras normais (leia-se: prateleiras que ocupassem toda a largura do armário).

Our home office has got two built-in cupboards. They’re quite shallow and were used as wardrobes by the previous owners (this used to be a bedroom), each one featuring two rods that run front to back  and a couple of little side shelves. For over a year, I used them as they were to store my sewing supplies — well, you can just picture the mess. After months of whining and complaining, Tiago finally agreed on building me some proper shelves.

IMG_4778

Aqui podem ver o Rodrigo a participar activamente, como é hábito, nas nossas aventuras domésticas. Também podem observar o estado em que ficou o interior dos ditos armários depois da “demolição” — urgia arranjar uma solução para aquilo. Ainda pensei em pintá-los, mas depois lembrei-me de algo com mais graça: papel de parede. Mais propriamente, papel de parede reciclado.

You can see Rodrigo here actively taking part in our domestic adventures, as we always does. You can also behold the state of said cupboards once the funny little shelves were dismantled — we really had to come up with a solution for them. I initially thought of painting the interior but then something else occurred to me: wallpaper. Upcycled wallpaper.

IMG_4809

IMG_4813

Forrei um dos armários com as páginas de um atlas desactualizado e o outro com pautas de música. Para colá-los à parede, usei blu tack (bostik), pela simples razão de que era aquilo que tinha à mão. Em seguida, o Tiago teve a gentileza de colocar as prateleiras (feitas de contraplacado e que eu — ou ele? já não me lembro… isto já foi feito há uns tempos — tinha previamente pintado de branco).

I lined one of the cupboards with pages from an old atlas and for the other one I used music sheets. In order to paste them to the wall, I simply used what I had on hand: blu tack (bostik). After that, Tiago was kind enough to build me those coveted shelves (made out of plywood, which I — or was it him? I can no longer remember… we did this ages ago — had previously painted white).

IMG_4784

Encontrei tanto o atlas como as pautas numa loja de caridade aqui na minha vila. Há imensas coisas que se podem usar para um efeito semelhante: revistas antigas, jornais estrangeiros, papel de embrulho… até tecidos!

Both the atlas and the music sheets were found in a local charity shop (op shop/thrift store). You can use all sorts of things for a similar effect: old magazines, foreign newspapers, wrapping paper… even fabric!

IMG_4824

Fiquei mesmo contente com esta transformação. Passei a ter muito mais alento para manter tudo arrumado!

I’m really happy with this renovation. It’s given me the motivation I needed to keep everything nice and tidy!

Por Aqui :: Around Here

autumn picnic in New Zealand - Constanca Cabral

romper made from a vintage Simplicity pattern, using Palos Verdes fabric - Constanca Cabral

gardening with kids : poding beans - Constanca Cabral

making a doll - Constanca Cabral

autumn flower arrangement - Constanca Cabral

quince paste - Constanca Cabral

[scroll down for English]

Por aqui… bem, por aqui passou-se um ano e muita coisa se passou durante este meu último ano.

Para começar, o blog tem um endereço novo, uma imagem nova, um nome novo. Obrigada à Sílvia, à Filipa e à Joana pela ajuda durante este longo processo de mudança.

Ainda há muito por fazer: acabar de arrumar o site, alterar alguns pormenores, enfim. Mas resolvi voltar a escrever aqui antes de estar tudo pronto. O grande mantra do empreendorismo contemporâneo é “start before you’re ready”, não é? Se ficarmos à espera de que todas as condições estejam reunidas para lançar (ou, neste caso, relançar) um projecto, se só dermos o primeiro passo depois de acharmos que tudo está perfeito… bem, então a tarefa de (re)começar torna-se hercúlea. Tenho vontade de voltar a escrever posts e vou tratando do resto com calma. Espero que se sintam confortáveis aqui e peço-vos alguma paciência para os próximos tempos.

Também espero que tanta coisa nova se traduza num novo fôlego para eu voltar a habitar esta casa. O blog esteve em pausa durante um ano mas o meu Instagram continuou bastante activo — e, mais importante ainda, eu nunca estive parada. Aliás, quando retirei a pressão (e a obrigação auto-imposta) de documentar os meus projectos (tirar várias fotografias, escrever textos com pés e cabeça), passei a fazer muito mais coisas, porque aquelas horas que gastava a elaborar posts passaram a ser canalizadas para o acto de simplesmente fazer. Partilhei a maior parte daquilo que fiz no Instagram e, durante uns meses, foi um alívio poder simplesmente tirar uma fotografia rápida com o telefone e escrever uma legenda curta, sem ter de me preocupar com estrutura, links, traduções e por aí fora. No entanto, com o passar do tempo — e à medida que me fui sentindo menos assoberbada e exausta — comecei a sentir falta de um espaço com maior profundidade. Fiquei com saudades deste blog que comecei há dez anos e que é a minha casa na internet.

Pensei muito durante este ano. Cheguei a algumas conclusões, mas há outras dúvidas que persistem. Hoje recomeço este blog sem planos estruturados, sem um calendário editorial rígido, sem grandes obrigações de periodicidade. Vou voltar a escrever posts quando me for possível, vou continuar a ser eu própria, às vezes mais aberta, outras vezes mais reservada.

Esta história de ter um blog sobre a minha vida quotidiana — em que o enfoque é sempre o acto de fazer à mãofazer em casa e fazer de forma simples  (mesmo quando essa aparente simplicidade acaba por ser bastante mais trabalhosa do que comprar já feito) — tem muito que se lhe diga. Consciente ou inconscientemente, a minha vida pessoal acaba por permear tudo aquilo que vou partilhando aqui. Por muito que eu estabeleça fronteiras, a linha que divide a “esfera pessoal” da “esfera privada”  é, por vezes, bastante cinzenta. E, depois, há aquele eterno dilema da imagem da minha vida que acaba por ser retratada neste espaço. Por muito que eu queira ser sempre transparente, honesta e eu própria, é inevitável que muitas coisas fiquem por dizer, por mostrar ou por explorar. Da mesma forma como não contamos todos os pormenores da nossa vida, em voz alta, numa sala cheia de gente, não nos expomos totalmente na internet. Há muitos de vocês que são meus conhecidos e meus amigos (e acreditem que este blog que tem feito conhecer muitas pessoas bestiais, com quem tenho desenvolvido amizades), mas também há muitas pessoas que me lêem e que nunca deixaram um comentário, nunca me abordaram na rua, nunca me escreveram um email. Há muitos desconhecidos agora e muitos mais haverá no futuro. Tudo isto para voltar a insistir na questão de que aquilo que partilho convosco é só uma parte da minha vida… está longe de constituir a totalidade da minha existência.

Por outro lado, a minha vida já não é só minha. Tenho um marido e dois filhos pequenos e, se não me faz confusão mostrar a cara deles aqui, entrar na sua esfera privada está fora de questão. (Sei que há toda a questão do direito à imagem deles, mas essa discussão vai ficar para outro dia.) Enfim, estes são temas muito complexos, ao ponto de se tornarem paralisantes. Vou continuar a agir com naturalidade e boa fé, vou continuar a povoar este espaço com boas energias e bons sentimentos e vou continuar a ter esperança e a acreditar no Bem.

Obrigada a todas as pessoas que estiveram presentes durante este último ano. Obrigada por todos os comentários no Instagram, pelos emails, pelos olás ao vivo e pelo entusiasmo com que recebem as minhas partilhas. Isto convosco tem muito mais graça.


Around here… well, it’s been a year and a lot has happened in this past year.

For starters, the blog has a new address, a new look and a new name. Thank you SílviaFilipa and Joana, for helping me throughout this process.

There’s still a lot to do: some recategorizing, a bit of formatting and a few tweaks here and there. But I’ve decided to resume my blogging activity before everything is finished. The great mantra of modern entrepreneurism is “start before you’re ready”, right? If you wait for every star to be aligned in the ideal position before you (re)launch something, if  you only take the first step when you feel everything is perfect… well, then the task of (re)starting takes herculean proportions. I feel the urge to blog again and I’ll take care of the rest in due time. I hope you’ll feel comfortable here and I ask you to bear with me while I tidy things up.

I didn’t blog for a year but I kept very active on Instagram. Once I took away the pressure (and self-imposed obligation) to document my projects — take several pictures, write proper compositions — I suddenly started making many more things, because those hours that I used to spend editing photos and writing posts were now being used solely for making. I shared most of my makes over at Instagram and, for a few months, it was such a relief to simply snap a picture with my phone and write a small caption, without worrying about structure, links, translations and so forth. However, as time went by and I felt less overwhelmed and less exhausted, I started craving a space with a little more depth to it. I missed this blog that I started writing ten years ago and that is my home in the internet.

During this past year I did a lot of thinking. I came to a few conclusions but many doubts still persist. Today I resume this blog with no big plans, no strict editorial calendar and no self-imposed obligations of consistency. I intend to post whenever I can and I’m going to go on being myself — sometimes more open, other times more reserved.

This business of blogging about my everyday life — even when the focus is making by handmaking at home  and making in a simple way (even when that apparent simplicity ends up being a lot more work that buying something ready-made) — can be a bit tricky. Whether consciously or unconsciously, my personal life ends up permeating a lot of what I share. As much as I establish boundaries, the line that separates my “personal sphere” from my “private sphere” can be quite grey. And then there’s that whole dilemma of the image of my life that ends up being portrayed here. As much as I strive to always be transparent, honest and myself, it’s inevitable that a lot of things don’t get told, shown or explored. In the same way that we don’t tell out loud every detail of our lives in a room full of people, we don’t entirely expose ourselves online. I do know some of you (some of you are friends and others are online acquaintances whom I’ve grown fond of) but there are others who’ve never left a comment, written me an email or had an interaction with me. This blog is read by many people who are, in fact, strangers to me — that’s the nature of the internet and I’m OK with it. But I feel like the need to state yet again that what I share online is just a portion of my life… it’s not the whole extension of my existence.

On the other hand, my life isn’t entirely my own any more. I’ve got a husband and two young children and while I don’t see a problem in sharing their faces, entering their private lives is out of the question. (I know there’s the whole conundrum of whether I’ve got a right to their images or not but we shall discuss that another time.) Anyway, these are very complex subject matters, so much so that they can sometimes be paralysing. I’ll continue to be natural and act in good faith, I’ll go on populating this space with good energies and good feelings and I’ll keep on having hope and believing in goodness.

Thank you to everyone who has been present throughout this last year. Thank you for every comment on Instagram, for every email, for every hello in the flesh and for the enthusiasm you’ve shown in regard to what I choose to share. You make everything a lot more fun.


Pausa :: Break

Ando há muito tempo com a sensação de que alguma coisa não está a funcionar no meu dia-a-dia. A tristeza e o isolamento que senti durante 2012 e 2013 felizmente desapareceram, mas não me consigo livrar de um enorme peso, de um grande cansaço e de um certo desajustamento em relação à minha vida presente.


Este blog vai ficar em pausa durante uns tempos. Não vou actualizar a página no Facebook e não me vou forçar a responder a emails. Acho que vou continuar pelo Instagram, porque é o único sítio na internet em que não sinto qualquer tipo de pressão, mas ainda não tenho a certeza.

Tenho muitos posts fotografados e alinhavados, e é possível que os vá publicando pouco a pouco, mas prefiro ter o blog inactivo e, de vez em quando, escrever umas coisas, do que um blog activo que está sempre a chamar por mim e a fazer-me sentir que estou a falhar.
Não me apetece escrever sobre isto em pormenor mas, como não gosto de cultivar uma aura de mistério nem tão pouco gerar qualquer tipo de especulação, vou acrescentar algumas palavras.

Quero viver durante uns tempos sem tecnologias. Ser mãe não é, para mim, especialmente fácil. Sou uma pessoa naturalmente introvertida, que precisa de silêncio e de algum espaço, e o dia-a-dia com crianças e sem apoio familiar tem um efeito esmagador sobre mim. Preciso de me focar, de não sentir pressões adicionais nem sucumbir a distracções. De aprender a lidar com as expectativas, aspirações e exigências da vida contemporânea.

Sinto-me constantemente sob tensão e, visto que não me apetece ter um colapso nervoso, vou experimentar alterar a maneira como vivo a minha vida.

Obrigada por me continuarem a acompanhar na minha viagem. Isto não é um adeus — é só um até qualquer dia.


I’ve known for a long time that something’s not working in my everyday life. The sadness and isolation that I felt during 2012 and 2013 have subsided but I haven’t been able to shake off a strong weight over my shoulders, a great tiredness and a sort of maladjustment in regard to my present life.

This blog is going to be still for a while. I’m not going to update my Facebook page and not going to force myself to deal with email. I might keep playing with Instagram because it’s the only place online where I don’t feel any pressure, but I can’t say for sure yet.

I’ve got lots of blog posts that are already photographed and half put together and I might publish something here from time to time, but I’d rather have an inactive blog that sometimes gets updated  that an active blog that’s always asking for more and that makes me feel like I’m failing all the time.

I’m not in the mood to write in detail about this but, since I don’t like to cultivate an air of mystery nor do I want to generate unnecessary speculation, I’m going to add a few words.

I want to live for a while with no technologies. Being a mother isn’t particularly easy for me. I’m a natural introvert and I need a fair amount of silence and space. My day-to-day with children and no family support has been quite overwhelming, frankly. I need to focus and I don’t need any additional distractions or pressures. I must learn how to deal better with all the expectations, aspirations and demands of modern life.

I feel I’m spreading myself too thin and since I don’t want to have a nervous breakdown, I’m going to try and alter the way I live my life.

Thank you for being here with me along this journey. This isn’t goodbye — it’s just “see you later”.

Vestido de Baptizado :: Christening Gown

handmade christening gown by Constanca Cabral

Durante as últimas semanas andei ocupada a fazer o vestido de baptizado do Pedro — aliás, todo o “ensemble”, porque fiz o vestido propriamente dito, o vestido interior, a touca e o babete (este último  não aparece nestas fotografias porque foi feito na véspera do grande dia e, mal foi posto a uso, ficou imediatamente sujo).
Foi o projecto mais elaborado, ambicioso — e, diria até, um bocadinho presunçoso — em que já me meti. Entrei nele com enormes doses de entusiasmo e inconsciência, sem ter propriamente elaborado um plano de acção meticuloso. O resultado é um vestido que me satisfaz cerca de 80%, mas no qual tenho bastante orgulho. Tentei ser o mais perfeita possível na execução e acabamentos — dentro das limitações da minha máquina de 1974, claro. Gosto do vestido? Sim. Adoro o vestido? Não. Gostei de ver o Pedro a ser baptizado com ele? Delirei!


Over the last few weeks I used up every free minute of my time to sew Pedro’s christening gown — actually, I should write “christening outfit”, really, because I sewed the dress, the slip, the bonnet and even a bib (which isn’t pictured here because I sewed it the night before of the big event and it became soiled two seconds after I put it on Pedro).
 
This was the most elaborate, ambitious — and even a bit presumptuous — project I’ve even got myself into. I embarked upon it with a great dose of enthusiasm and naivety, without even having set a meticulous plan of action. The result is a dress that I’m 80% happy with but one that, nonetheless, fills me with a sense of pride. I tried to be as neat as I could in terms of constructing and finishing — within the limitations of my 1974 machine, that is. Do I like the dress? Yes, I do. Do I love the dress? No, I don’t. Did I enjoy watching Pedro be christened while wearing it? That gave me the greatest pleasure!
christening gown front back heirloom sewing

Ora então vamos por partes:

1. Motivação
O Tiago e eu fizemos questão de que o Pedro fosse baptizado no país em que nasceu, mas havia o problema do vestido. Era impensável pedir à nossa família que nos enviasse um vestido antigo pelo correio (e se se perdesse?); por outro lado, nem me passou pela cabeça comprar um vestido novo. Posto isto, a única hipótese era ser eu a fazer o vestido. Há um ano assisti  a uma aula de “heirloom sewing” na loja Bernina aqui da zona, onde aprendi as técnicas-base de coser rendas e entremeios bordados. Esta primeira abordagem foi fundamental para desmitificar todo o mundo do “heirloom sewing” e proporcionou-me algumas ferramentas para depois aprofundar o assunto sozinha. Durante alguns meses pesquisei vestidos antigos e técnicas modernas e, a dada altura, resolvi não pensar mais e simplesmente comecei a fazer o vestido.


Let me tell you more:
 
1. Motivation
Tiago and I were both extremely keen that Pedro should be baptised in the country where he was born… but what about the dress? I didn’t have the guts to ask for the family gown to be sent through the post (what if it got lost?) and I didn’t consider even for one minute the possibility of buying a new dress. So there was just one option: I had to make it myself. Last year I took an heirloom sewing class at my local Bernina shop, where I learned the basics about sewing laces and embroidered trims. This class was great for demystifying the whole “heirloom sewing” world and gave me a few tools to seek more information on my own. For a few months I researched old dresses and modern techniques and then there came a point where I just had to stop looking and actually start sewing.
planning a christening gown
planning a christening gown heirloom sewing
2. Planos e materiais
Pensei em algumas opções para o vestido e fiz vários esboços, mas o desenho final acabou por ser totalmente determinado pelas limitações dos materiais ao meu dispôr. Queria que o vestido reflectisse  a herança cultural do Pedro e que nele constassem elementos portugueses, neozelandeses, de família, de amigos, enfim. Estava determinada a bordar, a branco, um motivo central com corações e flores de Viana e fetos nativos da Nova Zelândia mas, com grande pena minha, isso não chegou a acontecer. Talvez se tivesse começado a fazer o vestido três meses mais cedo…


Aqui na Nova Zelândia comprei a cambraia branca, assim como o entremeio de renda e o ajour. O folho em bordado inglês foi-me dado pela minha avó e a renda com que debruei o decote e os punhos foi-me oferecida, há uns anos, por uma amiga brasileira. Os dois outros entremeios bordados foram comprados online. Fiz nervuras no peito e nas mangas com uma agulha dupla e utilizei sempre linha de algodão Mettler 60.


2. Plans and materials
I thought about a few different options but the final design ended up being entirely determined by the limited materials I had at hand. I wanted the dress to be a reflection of Pedro’s cultural heritage, with elements that would reference Portugal, New Zealand, family and friends. I was determined to embroider, in white, a central motif with Portuguese folk hearts and flowers and NZ native ferns, but unfortunately I ran out of time. Maybe if I had started working on the dress three months earlier…
 
Here in NZ I bought the white lawn as well as the lace insertion and the entredeux. The broderie anglaise edging was given to me by my grandmother and the lace edging (or is it tatting?) was a present from a Brazilian friend many years ago. The other two embroidered insertions were bought online. I used a double-needle to make narrow pintucks on the centre front of the dress and on the sleeves and used Mettler 60 cotton thread throughout.


3. Molde
O molde que usei como base foi o Simplicity Babies 2629, vista A com mangas C (este molde é uma reprodução de um molde de 1948, e eu já o tinha experimentado há uns anos). Comecei por fazer um ensaio para ver se o tamanho 6 meses servia ao Pedro e, visto que ficava mesmo à medida, aumentei o comprimento da saia e avancei para o vestido de baptizado. Mas depois as coisas começaram a complicar-se… Quando já ia a meio do vestido, resolvi começar de novo. Apercebi-me de que seria melhor de fazer um vestido ainda mais comprido, de forma a compensar a quantidade de entremeios que resolvi usar (admito que fui gulosa e optei pela bordagem “more is better” em vez do meu habitual “less is more”) e completamente aberto atrás (o molde original tem apenas uma pequena abertura atrás, mas cheguei à conclusão de que não seria nada prática para vestir e despir, nem tão pouco eficaz… o facto de o vestido ser todo aberto atrás permitiu-me pegar no Pedro ao colo de maneira a que a frente do vestido continuasse com bom cair).


3. Pattern 
I based the dress on Simplicity Babies 2629, view A with sleeves C (this pattern is a reproduction from a 1948 one and I had already used it a few years ago). I started by sewing up a test version in order to check the fit of size 6 months and, since it fit well, I just traced a longer skirt and started making the christening gown. But then things got a little more complicated… When I was already half-way through, I decided to start over. I realised that I should make an even longer dress in order to balance out the amount of insertions I ended up including in the fancy band (I admit I was greedy in  wanting to show off all of my pretty trims) and one that had a completely open back (the original pattern features a short placket on the back but I quickly realised that such a small opening wouldn’t be very practical when it came to dress and undress the baby, nor would it be very effective… an open back would allow me to handle Pedro much more easily and would prevent bunching up the skirt… I  really wanted that fancy band to drape beautifully!).


handmade christening gown by Constanca Cabral heirloom sewing

heirloom sewing by Constanca Cabral christening gown

4. Técnicas
Comecei por fazer as nervuras com uma agulha dupla e um pé calcador especial (útil, mas nem por sombras obrigatório) em rectângulos de tecido (um grande para o corpo e dois mais pequenos para as mangas), e só depois usei o molde para cortar as peças. As rendas e os bordados foram aplicados com um pé calcador normal, alternando os pontos corrido e zigzag. Consegui utilizar costuras inglesas em tudo, até na inserção das mangas, o que me deixou muito contente. A certa altura debati-me com o facto de as costuras estarem a ficar todas repuxadas mas, depois de ter limpado e oleado a máquina,  mudado de agulha e voltado a enfiar a linha, o problema desapareceu. Apesar de gostar muito da minha máquina quarentona, houve alturas em que desejei ardentemente ter uma máquina moderna toda xpto, não vou mentir. Continuo a achar que há máquinas antigas bestiais (e a minha Bernina Record 830 é uma delas), mas para este tipo de “costura fina”, suspeito que uma máquina moderna deva dar um jeitão.


4. Techniques
I pintucked the fabric using a double-needle and a special presser foot (which was useful, but not compulsory) before I even cut out the pattern, which means that I roughly cut one large and two smaller rectangles, pintucked them and only then did I cut out the pattern pieces for the front and for the sleeves. I sewed the laces, the entredeux and the embroidered trims with a regular foot, alternating between straight and zigzag stitching. I managed to French-seam the entire thing, even the sleeves, and that made me feel very happy and smug. I did struggle with puckered seams for a while but after I cleaned and oiled the machine, changed the needle and rethreaded it, things got much easier. Even though I love my 41-year-old machine, there were times when I felt a burning desire for a modern, top-of-the-line sewing machine, I’m not going to lie. I still believe that there are some wonderful vintage sewing machines out there (and my Bernina Record 830 is definitely one of them), but for this kind of “fine sewing” I suspect a modern machine must come in handy.


christening bonnet lace insertion heirloom sewing

5. Acessórios
O vestido interior foi feito com base no mesmo molde, desta vez a vista F com algumas modificações. A touca é baseada num modelo antigo, também com modificações. Para ficar a condizer com o vestido, cosi-lhe umas quantas nervuras e apliquei-lhe um dos entremeios bordados que usei na barra da saia, assim como a mesma renda com que debruei o decote e os punhos.


5. Accessories
The slip was cut using view F the same pattern, with a few alterations. The bonnet was based on a vintage pattern, with a few tweaks of my own. In order for it to match the dress, I included one of the trims I used on the skirt, as well as a few pintucks and the same lace edging used on the collar and sleeves.


f32a2-img_7516


6. Balanço
O que me aborrece:
– O facto de o entremeio mais largo da barra do vestido não ser tão branco como os restantes (o quarto onde coso é um bocado escuro e só me apercebi do contraste quando vi estas fotografias).
– Não ter conseguido fazer o famigerado bordado — o vestido foi todo desenhado em função desse bordado e, se tivesse decidido logo à partida que não teria tempo para o fazer, acho que teria desenhado um vestido diferente.
– Ter estado tão limitada com os materiais.
– Ter cosido o vestido à pressa (por culpa minha) e com inúmeras e frustrantes interrupções (perfeitamente normais… fazem parte de ter dois filhos pequenos).


O que me alegra:
– Fiz um vestido de baptizado!
– Esforcei-me imenso e fartei-me de aprender.
– A filha de uma amiga minha ganhou dois vestidos novos (depois mostro-vos os ensaios em pormenor noutro post).
Agora estou a precisar de umas férias!


6. Final assessment
Things that bother me:
– The fact that the widest eyelet insertion on the fancy band is not as white as the other trims (my sewing room is rather dark and I only noticed the contrast when I looked at these photos).
– Not having done the whitework — especially because that was the “raison d’être” of this dress. Had I decided straight away that I wouldn’t have time to make the embroidery, I think I would have designed a different dress.
– Being so limited by the materials I had.
– Having sewn the dress in such a race against time (my fault entirely) and the constant and oh so frustrating interruptions (that are perfectly natural and come with having two young children).
 
Things that make me happy:
– I made a christening gown!
– I strove to do my best and learned so much.
– My friend’s little daughter will get two new dresses (I’ll talk about my trials runs in detail on another blog post).
 
Now I need a break!
handmade christening gown by Constanca Cabral