Tricots de Bebé :: Knitting for Baby

Tenho a enorme sorte de ter uma mãe que sabe e gosta de tricotar. E um bebé é a desculpa perfeita para procurar lãs e modelos e fazer experiências. Há uns tempos recebi estes dois tricots pelo correio: um xaile azul (adoro o pormenor do ponto de cobertor a branco) e um saco-cama branco. Ouvi dizer que já há mais alguns à minha espera…
I’m incredibily lucky to have a mother who can and likes to knit. And a baby is the perfect exuse to look for yarns and patterns and to experiment. A while ago I received these two hand-knitted things by post: a blue shawl (I love the detail of the white blanket stitch) and a white sleeping bag. I hear there are more things waiting for me…
(photos: Constança Cabral)

Licor de Abrunho :: Damson Liqueur

Às vezes ouvimos contar que as nossas avós e bisavós faziam licores em casa. “Extraordinário!”, pensamos, “que senhoras industriosas.” Pois hoje eu venho desfazer um mito: fazer licor em casa é facílimo. Há dezenas de receitas disponíveis (a minha edição do Pantagruel tem 18) mas no fundo trata-se sempre de deixar macerar a fruta em álcool, açúcar e especiarias.
As duas fotografias foram tiradas com um mês de intervalo: é o nosso licor de abrunho, no dia em que foi feito e hoje. No Natal será filtrado e engarrafado — e bebido. O método é simples: meio quilo de fruta, 125 g de açúcar fino, raspa de um limão, um pau de canela e uma garrafa de vodka: tudo para dentro de um frasco grande e limpo (caso estivéssemos a viver em Portugal, teríamos usado aguardente). Agitar todos os dias. Esperar tês meses. Filtrar e engarrafar. O mais engraçado de tudo é que usei um frasco que a minha bisavó materna usava para fazer os licores lá de casa.
Sometimes we hear our family tell tales of how our grandmothers and great-grandmothers used to make liqueurs at home. “How extraordinary”, we think, “such industrious ladies”. Well, today I’m going to undo this myth: homemade liqueurs are the easiest things. There are dozens of recipes available but deep down it all comes to letting the fruit macerate in alcohol, sugar and spices. 

The two pictures above have been taken with a month’s difference: it’s our damson liqueur the day it was prepared and today. By Christmas time we’ll filter and bottle it — and drink it. Here’s how we made it: half a kilo of fruit, 125 g of caster sugar, the zest of a lemon, one cinnamon stick and one bottle of vodka: all poured into a large, clean jar. Shake it every day. Wait 3 months, then strain and bottle it. The loveliest thing was that I utilised the jar my great-grandmother used to employ to prepare her own liqueurs. 

(photos: 1- Tiago Cabral; 2- Constança Cabral)

Clutches com Botões :: Button Clutches

Após muitas, muitas horas a escolher a cor, o tamanho e a localização ideal de cada botão, posso finalmente dizer que há três novas clutches disponíveis na loja. Duas são feitas em linho grosso e cada uma tem mais de 100 botões cosidos a toda a volta (uma em tons de azul, a outra de castanho); a última é feita num algodão estampado com flores gráficas e tem 40 botões em tons de cinzento e preto cosidos apenas no centro. Estão as três aqui.

After many, many hours choosing the ideal colour, size and placement for each button, I can finally say that there are three new clutches in the shop. Two of them have been made in corse, unbleached linen and each of them has more than 100 buttons hand-sewn all around its top (one in shades of blue, the other in tones of brown); the third one has been made using a piece of cotton printed with graphic flowers and has 40 buttons in black and grey hand-sewn to its centre pannel. They’re all available here.

(photos: Tiago Cabral)

Arranging Autumn Flowers :: Guest Post @ { TheSneakPeaks }

[Este meu guia passo-a-passo de como fazer arranjos florais de Outono foi inicialmente publicado no blog {TheSneakPeaks} a convite da Ana. Podem ver o post original aqui.]
[My step-by-step guide on how to create autumnal flower arrangements was first posted at {TheSneakPeaks} by Ana‘s request. Check out my original post here.]

O ritmo das estações do ano nunca deixa de me surpreender e fascinar e gosto que o interior da minha casa vá reflectindo o que se passa lá fora. Uma das maneiras mais fáceis e eficazes de alcançar isso é através de arranjos florais sazonais. Sou grande apologista de flores de jardim e de campo. Sei que nem toda a gente tem a sorte de ter um jardim, mas há sempre a possibilidade de reservar um sábado ou um domingo para dar um passeio pelo campo — sabe bem mudar de ares e as beiras das estradas estão carregadas de flores, folhas e frutos interessantes. Estamos a entrar no Outono, a minha estação preferida aqui em Inglaterra (mudei-me de Portugal para Inglaterra em Janeiro de 2010), e a natureza está progressivamente a revestir-se de tons quentes e saturados: amarelos, magentas, castanhos… Inspirada naquilo que me rodeia, criei dois arranjos outonais e vou mostrar-vos como os fiz.

The rhythm of seasons never fails to impress and fascinate me and I like my home to be a reflection of what’s going on outdoors. One of the easiest and most effective ways of achieving this is by creating seasonal flower arrangements. I’m a great fan of garden and country flowers. I know not everyone is lucky to have their own garden but you can always dedicate a Saturday or a Sunday to country pursuits — it feels great to see what nature has to offer and roadside verges are usually laden with interesting flowers, leaves and fruits. Autumn is upon us and it’s definitely my favourite season here in England (I moved from Portugal to England in January 2010). Nature is dressing itself in warm, saturated colours: yellow, magenta, brown… Inspired by what surrounds me at the moment, I’ve created two autumnal arrangements and I’m going to show you how I made them.

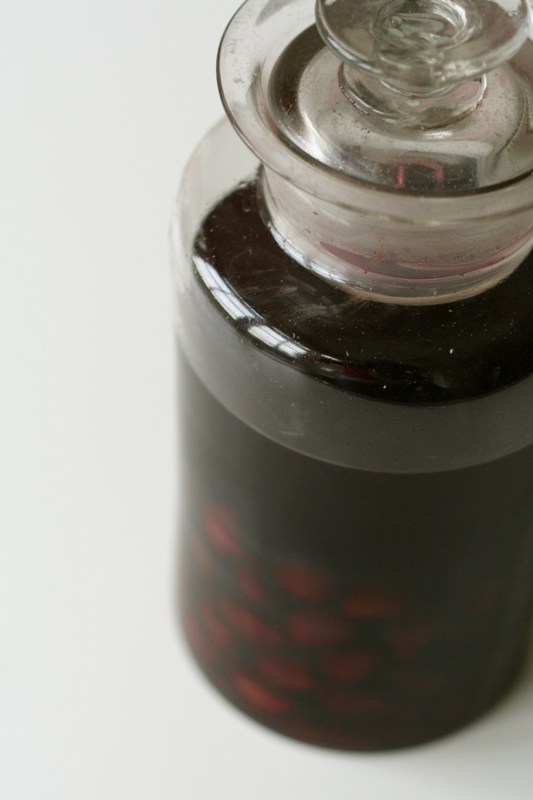
Primeiro há que seleccionar flores, bagas e folhas para os nossos arranjos. Normalmente apanho tudo o que me chama a atenção e só depois decido o que usar em cada arranjo. Neste caso comecei por apanhar hortênsias, uma dália, algumas rosas e bagas de sabugueiro. Tanto no caso das hortênsias como das bagas de sabugueiro, escolhi propositadamente exemplares que não estavam perfeitos: as hortênsias já estavam um bocado passadas e picadas, e as bagas ainda não estavam completamente maduras. A forma como arranjo flores é muito espontânea e nada académica, e vão ver que algumas flores (como as rosas) ficaram de lado, enquanto que outras (ervilhas-de-cheiro, sedum, abrunhos silvestres e até amoras) aparecerão mais à frente. É importante retirar todas as folhas dos caules que ficarão submersas em água, porque apodrecerão rapidamente e contaminarão a água da jarra, o que significa que todo o arranjo se aguentará fresco menos tempo. Há também que escolher os recipientes para os arranjos: eu usei uma jarra de vidro transparente e uma forma de esmalte branco.

First you need to select the flowers, foliage and berries for your arrangements. I usually pick everything that grabs my attention and only later do I decide what to actually use in each arrangement. In this case I started by picking some hydrangea heads, one dahlia, a handful of roses and a few elderberries. I intentionally picked specimens that didn’t look perfect: the hydrangeas are past their best and the elderberries aren’t fully ripe yet. The way I arrange flowers is quite spontaneous and not academic in the least so you’ll see that some flowers (like the roses) won’t be used at all and some others (sweet peas, sedum, sloes and even blackberries) will put up an appearance later on. An important step is to remove the leaves from the lower portion of the flowers, as they’ll rot quickly and will contaminate the water in the vase, making the whole arrangement last fewer days. You also must choose your containers: I picked a transparent glass vase and a white enamel jelly mould.


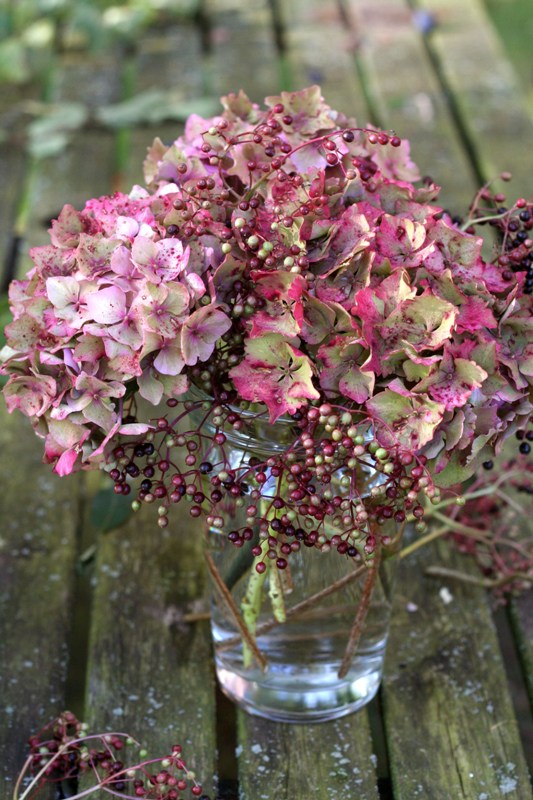
Comecei por fazer o arranjo maior, que pus dentro da jarra transparente. Normalmente faço os meus arranjos por camadas, e neste caso a primeira camada, formada pelas bagas de sabugueiro, serve para amparar as flores que se seguem.


I started with the largest arrangement, which was destined for the glass vase. I usually work in layers and in this particular situation the elderberries make a great first layer, as they’ll anchor the rest of the flower stems.

Em seguida dispus algumas hortênsias entre as bagas.


Then I placed a few hydrangea heads amongst the berries.

Este arranjo foi feito no jardim e, enquanto estava a fazê-lo e fotografá-lo, dei de caras com um canteiro de sedum com um tom de cor-de-rosa perfeito para a ocasião. Claro que apanhei alguma flores e acrescentei-as ao arranjo.


While I was arranging and photographing this in my garden, a bunch of sedum flowers caught my eye. As they had the perfect shade of pink, I cut a few and added them to the vase.

A certa altura achei que o arranjo estava um pouco contraído e que lhe faltava algum movimento — então peguei em algumas ramagens de abrunhos silvestres (cuidado com os espinhos!) e dispu-las em direcções opostas dentro da jarra.


At this moment I felt the arrangement was a bit contrived and that it was lacking some movement — so I cut some sloe branches (watch those thorns!) and placed them in opposite directions within the vase.

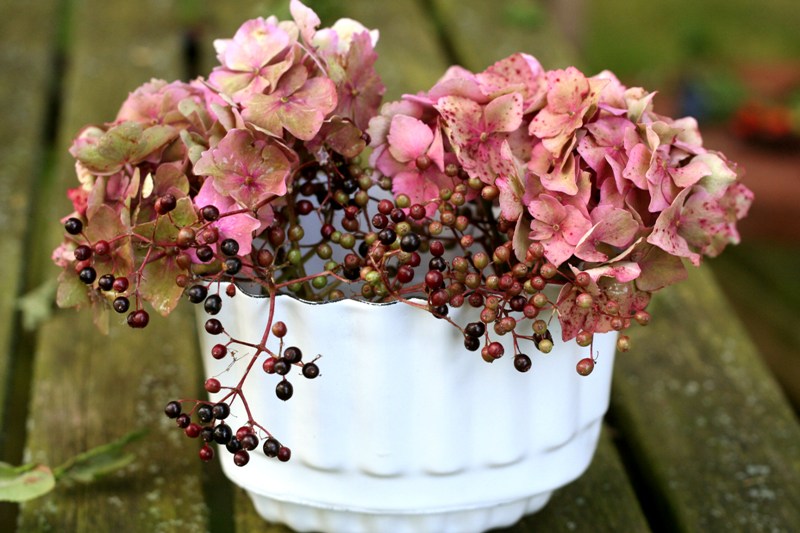
Em seguida, dediquei-me ao arranjo mais pequeno. A técnica (se é que lhe posso dar este nome) que usei foi semelhante à do arranjo maior: comecei por dispor as bagas e flores mais carnudas (neste caso hortênsias)…


Then it was time to make the smaller arrangement. The technique (if I may call it that) I used was similar to how I made the larger arrangement: I started by setting out the berries and the fuller flowers (the hydrangeas in this case)…

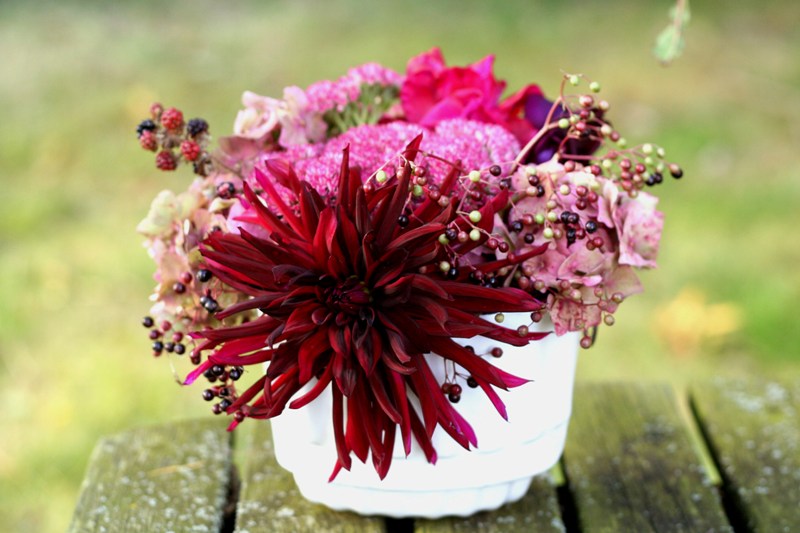
… depois coloquei a dália em evidência e enchi os espaços vazios com sedum, ervilhas-de-cheiro e amoras.


… then I placed the dahlia in the most prominent spot and filled any gaps with sedum, sweet peas and even a bunch of blackberries.

Podem ver que ainda acrescentei dois ramos de abrunhos silvestres ao arranjo pequeno.

You can see that in the end I couldn’t resist adding a couple of slow branches to the smaller arrangement.

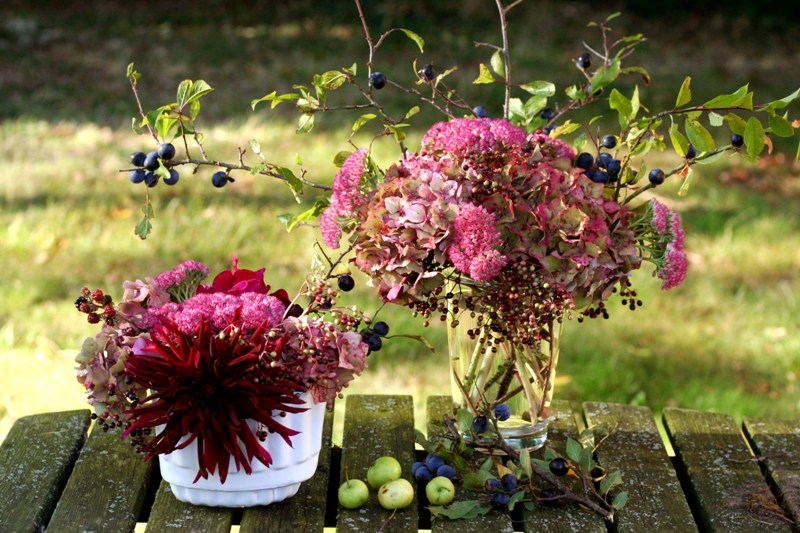
E assim se fazem dois arranjos outonais, perfeitos para enfeitar um canto de nossa casa durante uma semana. Espero que gostem das minhas sugestões e que se aventurem com aquilo que encontrarem por esse campo fora.

And so we have two autumn flower arrangements, perfect for adding a bit of colour to a corner of your home for a week. I hope you like my suggestions and that you feel inspired to experiment with your own country finds.

(photos: Constança Cabral)

Tingir com Chá :: Dyeing with Tea Bags

Estou a fazer umas bonecas para oferecer e precisava de flanela cor-de-pele para os corpos. No entanto, cá em casa só tenho flanela branca… metros e metros dela. Lembrei-me então de que poderia experimentar tingi-la com chá — e visto que a experiência resultou, partilho-a aqui convosco. O processo é bastante intuitivo: deitar dois ou três sacos de chá para dentro de uma taça grande, despejar bastante água a ferver, submergir o tecido durante uns minutos e ir mexendo com uma colher de pau (para que a cor fique bem distribuída), passar debaixo da torneira até que a água saia limpa, estender, passar a ferro. A diferença de cor é subtil, mas perfeita para o efeito desejado.

(aqui está a boneca pronta)

I’m making some dolls as gifts and I suddenly needed skin-toned flannel to make the bodies. However, the only flannel I’ve got here at home is white… and there’s metres and metres of it. So I thought I might try dyeing it with tea bags — and since the whole experience worked out fine, I’m going to share it with you. The process is quite intuitive: toss two or three tea bags into a large bowl, pour boiling water on them, submerge the fabric for a few minutes and stir it with a wooden spoon (so that the colour is well distributed), rinse it under the tap until the water runs clear, hang it out to dry, iron it. The difference in colour is subtle but perfect for the purpose in mind.

(you can see the finished doll here)

(photos: Constança Cabral)

Coin Quilt :: Binding

Finalmente acabei de acolchoar à mão o meu coin quilt; agora só falta debruá-lo. Normalmente debruo os meus quilts com fitas cortadas a direito, mas desta vez resolvi escolher um tecido aos quadrados e cortá-lo em viés. Está quase, está quase…
I’ve finally finished hand-quilting my coin quilt; now all that’s left is to bind it. I usually cut my bindings on the straight grain of the fabric but this time I chose a gingham print and cut it on bias. I’m nearly there…

(photos: Constança Cabral)

Autumn :: Log Carrier

Finalmente fiz algo que o Tiago me andava a pedir há que tempos: um saco para transportar lenha. Não só serve para trazer para dentro de casa a lenha que o Tiago racha no jardim, como é óptimo para apanhar os galhos que vão caindo das árvores (esta zona é bastante ventosa) e que são ideiais para acender a lareira. O sistema não poderia ser mais simples: trata-se apenas de um círculo de oleado (queria ter cortado outro círculo para forrar o interior mas não havia oleado suficiente) debruado com um galão, a que depois cosi duas alças reforçadas. Esperemos que dure!
I’ve finally made something Tiago has been asking for a long time: a log carrier. It’s great not only to carry the wood he cuts in the garden inside, but also to collect those twigs that keep falling from trees (it’s rather windy around here) and which make ideal kindling. The construction of the carrier couldn’t be simpler: it’s just an oilcloth circle (I wish I’d had enough to cut another one in order to line it) bound with tape, with two strong handles sewn to it. Let’s hope it lasts!

(photos: Constança Cabral)

Almofada de Retalhos :: Patchwork Cushion

Fiz mais uma almofada para a sala, desta vez com restos de tecidos que usei em poufs e sacos. Comecei por coser um painel com cem pequenos quadrados de cinco tecidos diferentes, ao qual acrescentei umas bandas; como já não tinha suficiente para a parte de trás, utilizei dois panos da loiça que tinha comprado com a intenção de aproveitar o tecido. Gosto da nossa nova almofada!
I made a new cushion for our sitting room, this time with fabric scraps left from making ottomans and bags. I started by sewing a panel with 100 little squares in 5 different prints, to which I then added some borders; because I didn’t have enough spotty fabric to make the back, I decided to use two tea towels I once bought with the sole intention of using the material for sewing projects. I quite like our new pillow!

(photos: Constança Cabral)